Ginger and chili kick starter – without a juicer

Are you among those people that believe that you need a nice and expensive juicer to make your own juice? Well, I was once one of those people and as I knew I was moving from one end of the world to another I didn’t wanna go and spend the necessary amount of money on a juicer and was therefore not making any juices.
After a winter with a few colds, a sore throat and a bad craving for home made juice I decided to come up with an alternative. I went to my kitchen, looked in all my cabinets and quickly decided to try the blender, bowl, colander and kitchen towel method and you know what? It worked perfectly… and in that moment I realized that I had probably just saved about $200 (the average price for a good juicer in Denmark) – $200 that I could use on something else and still get a perfect juice whenever I wanted 🙂
Know that I have moved I still use this method as I find it a little stupid to spent money on something that I can do myself and get the same result. Of cause it takes a little longer (15 minutes) but I think it is worth it in the end and you will definitely fell more passionately about your juice when it is made this way 🙂

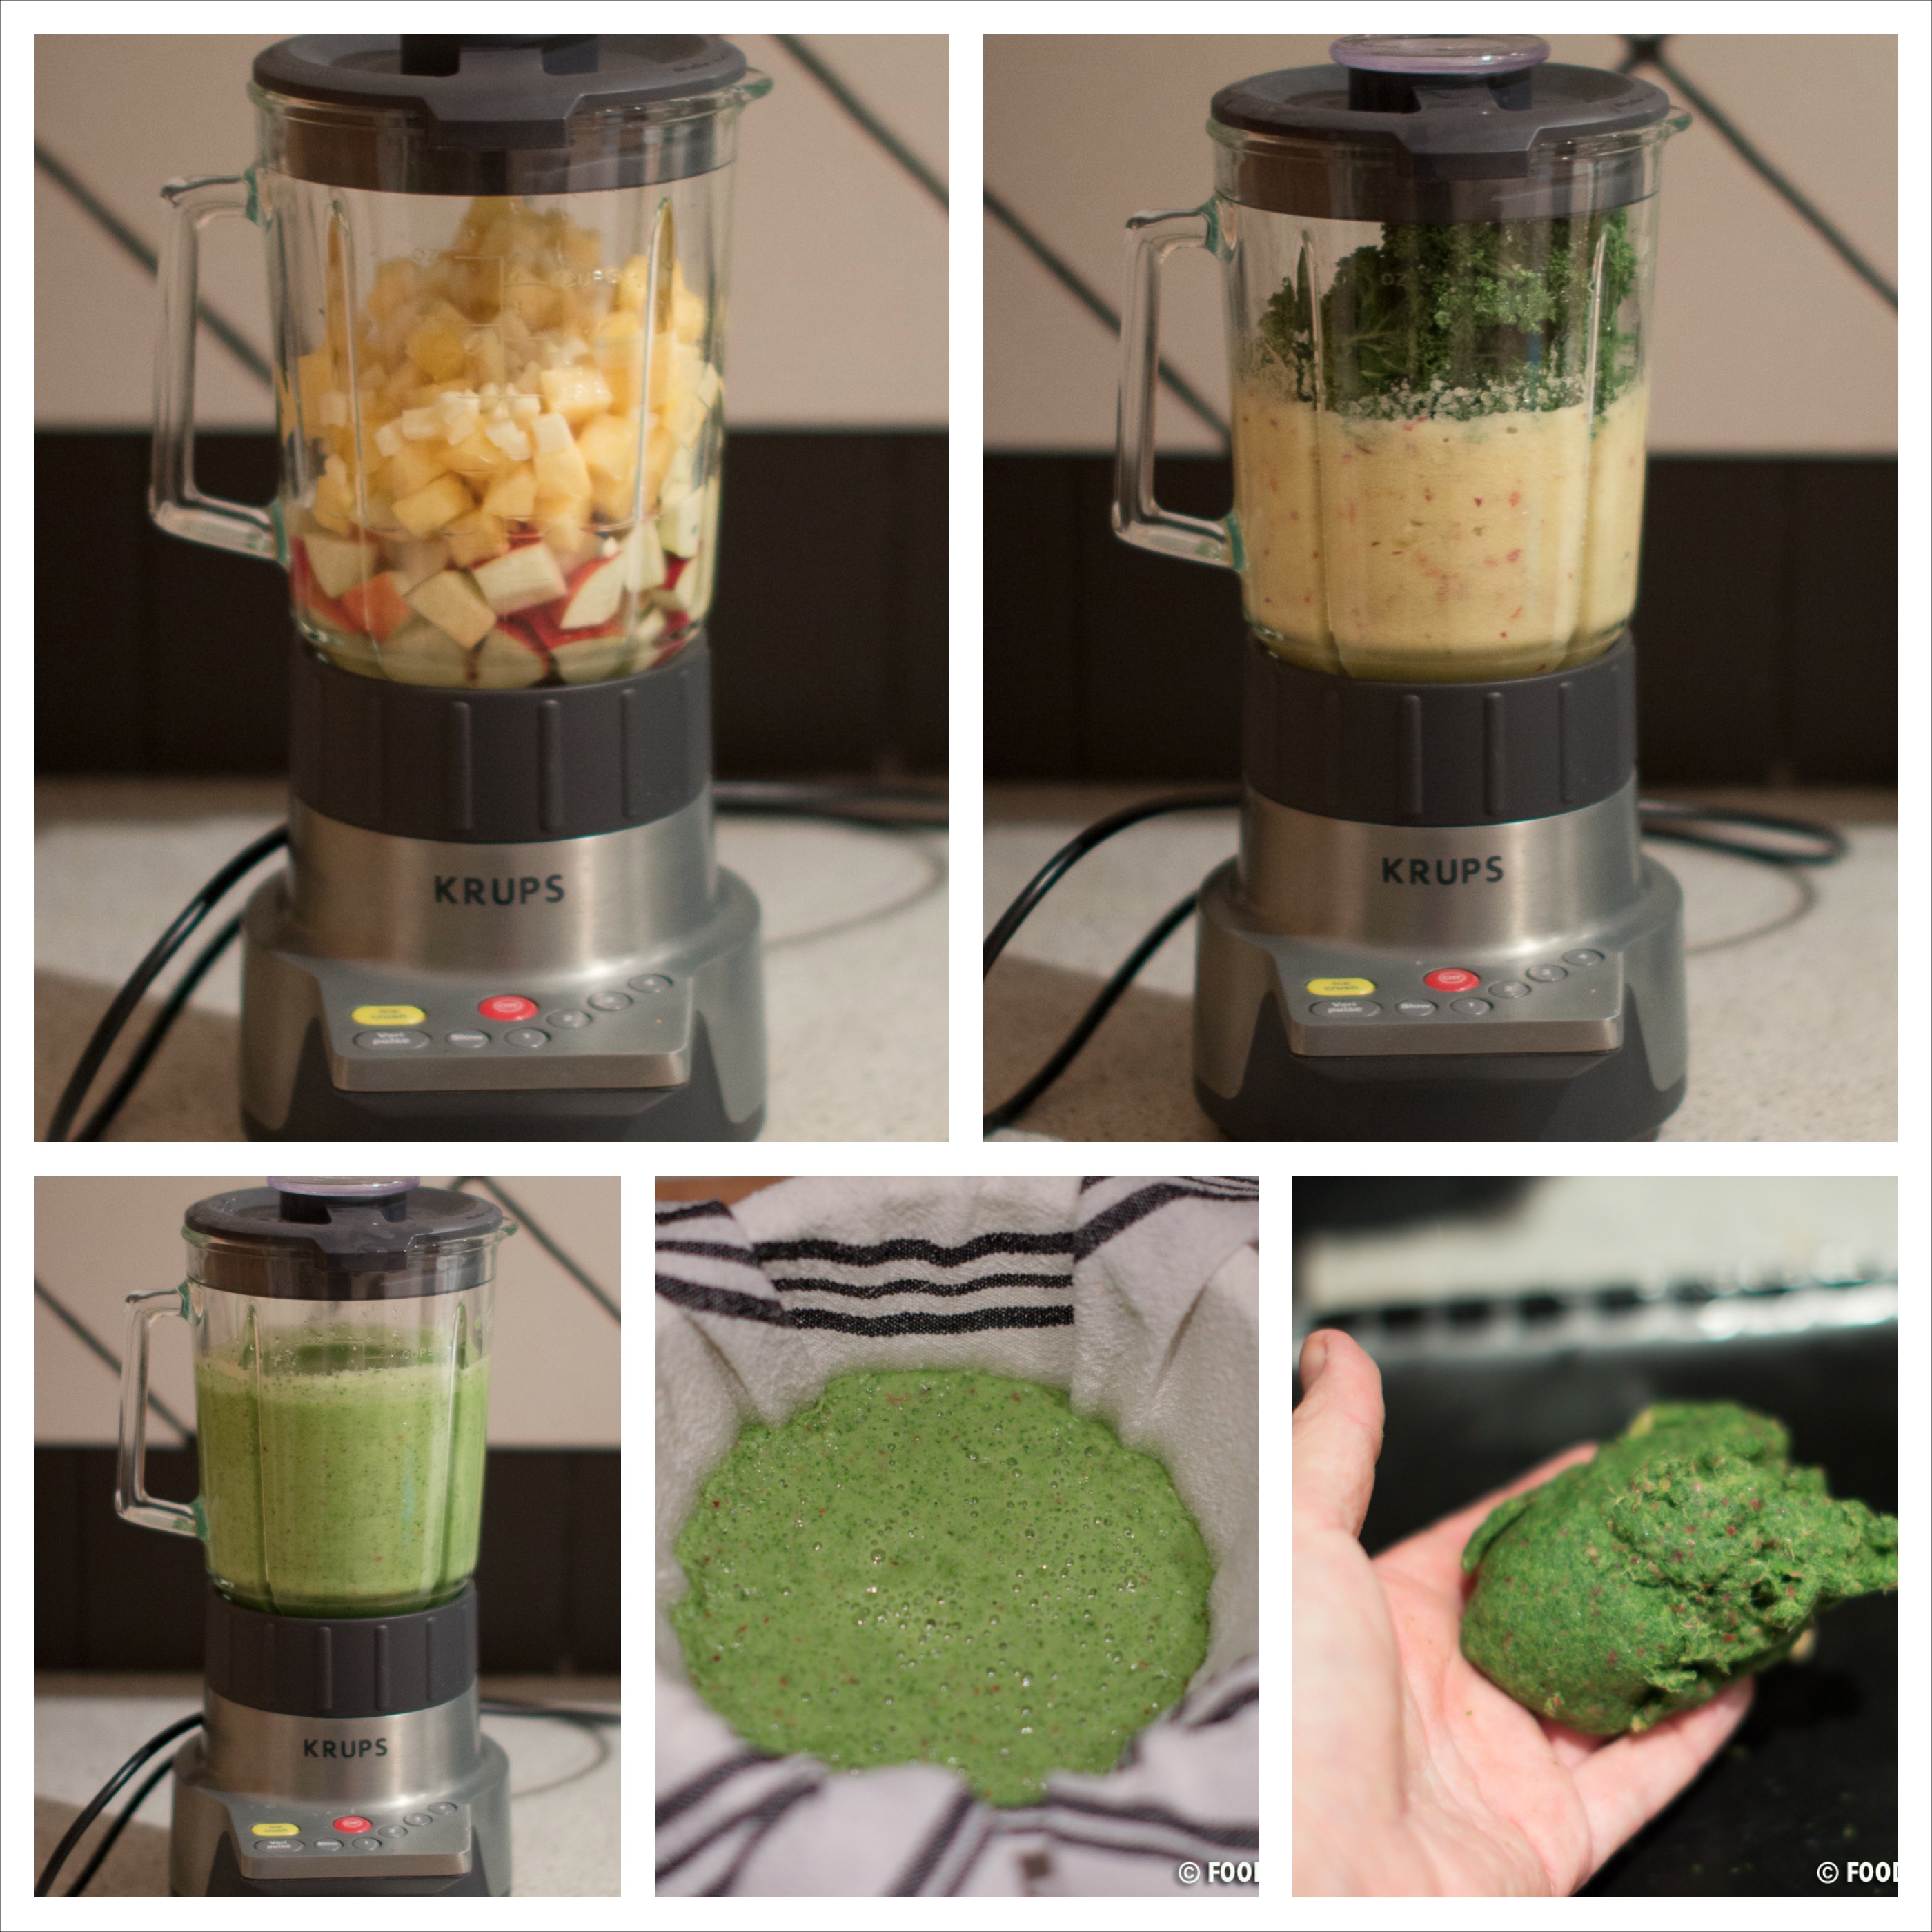
If you get hooked on the juice-without-a-juicer idea, you can check out my other my other juice recipes which includes carrot and clementine, clementine and orange, cranberry enegizer and the green vitamin bomb.

Ingredients (4 servings)

2 large or 4 medium apples

1 orange

0.5 lemon

1 chili

1 tbsp ginger root

0.5 cup water, cold

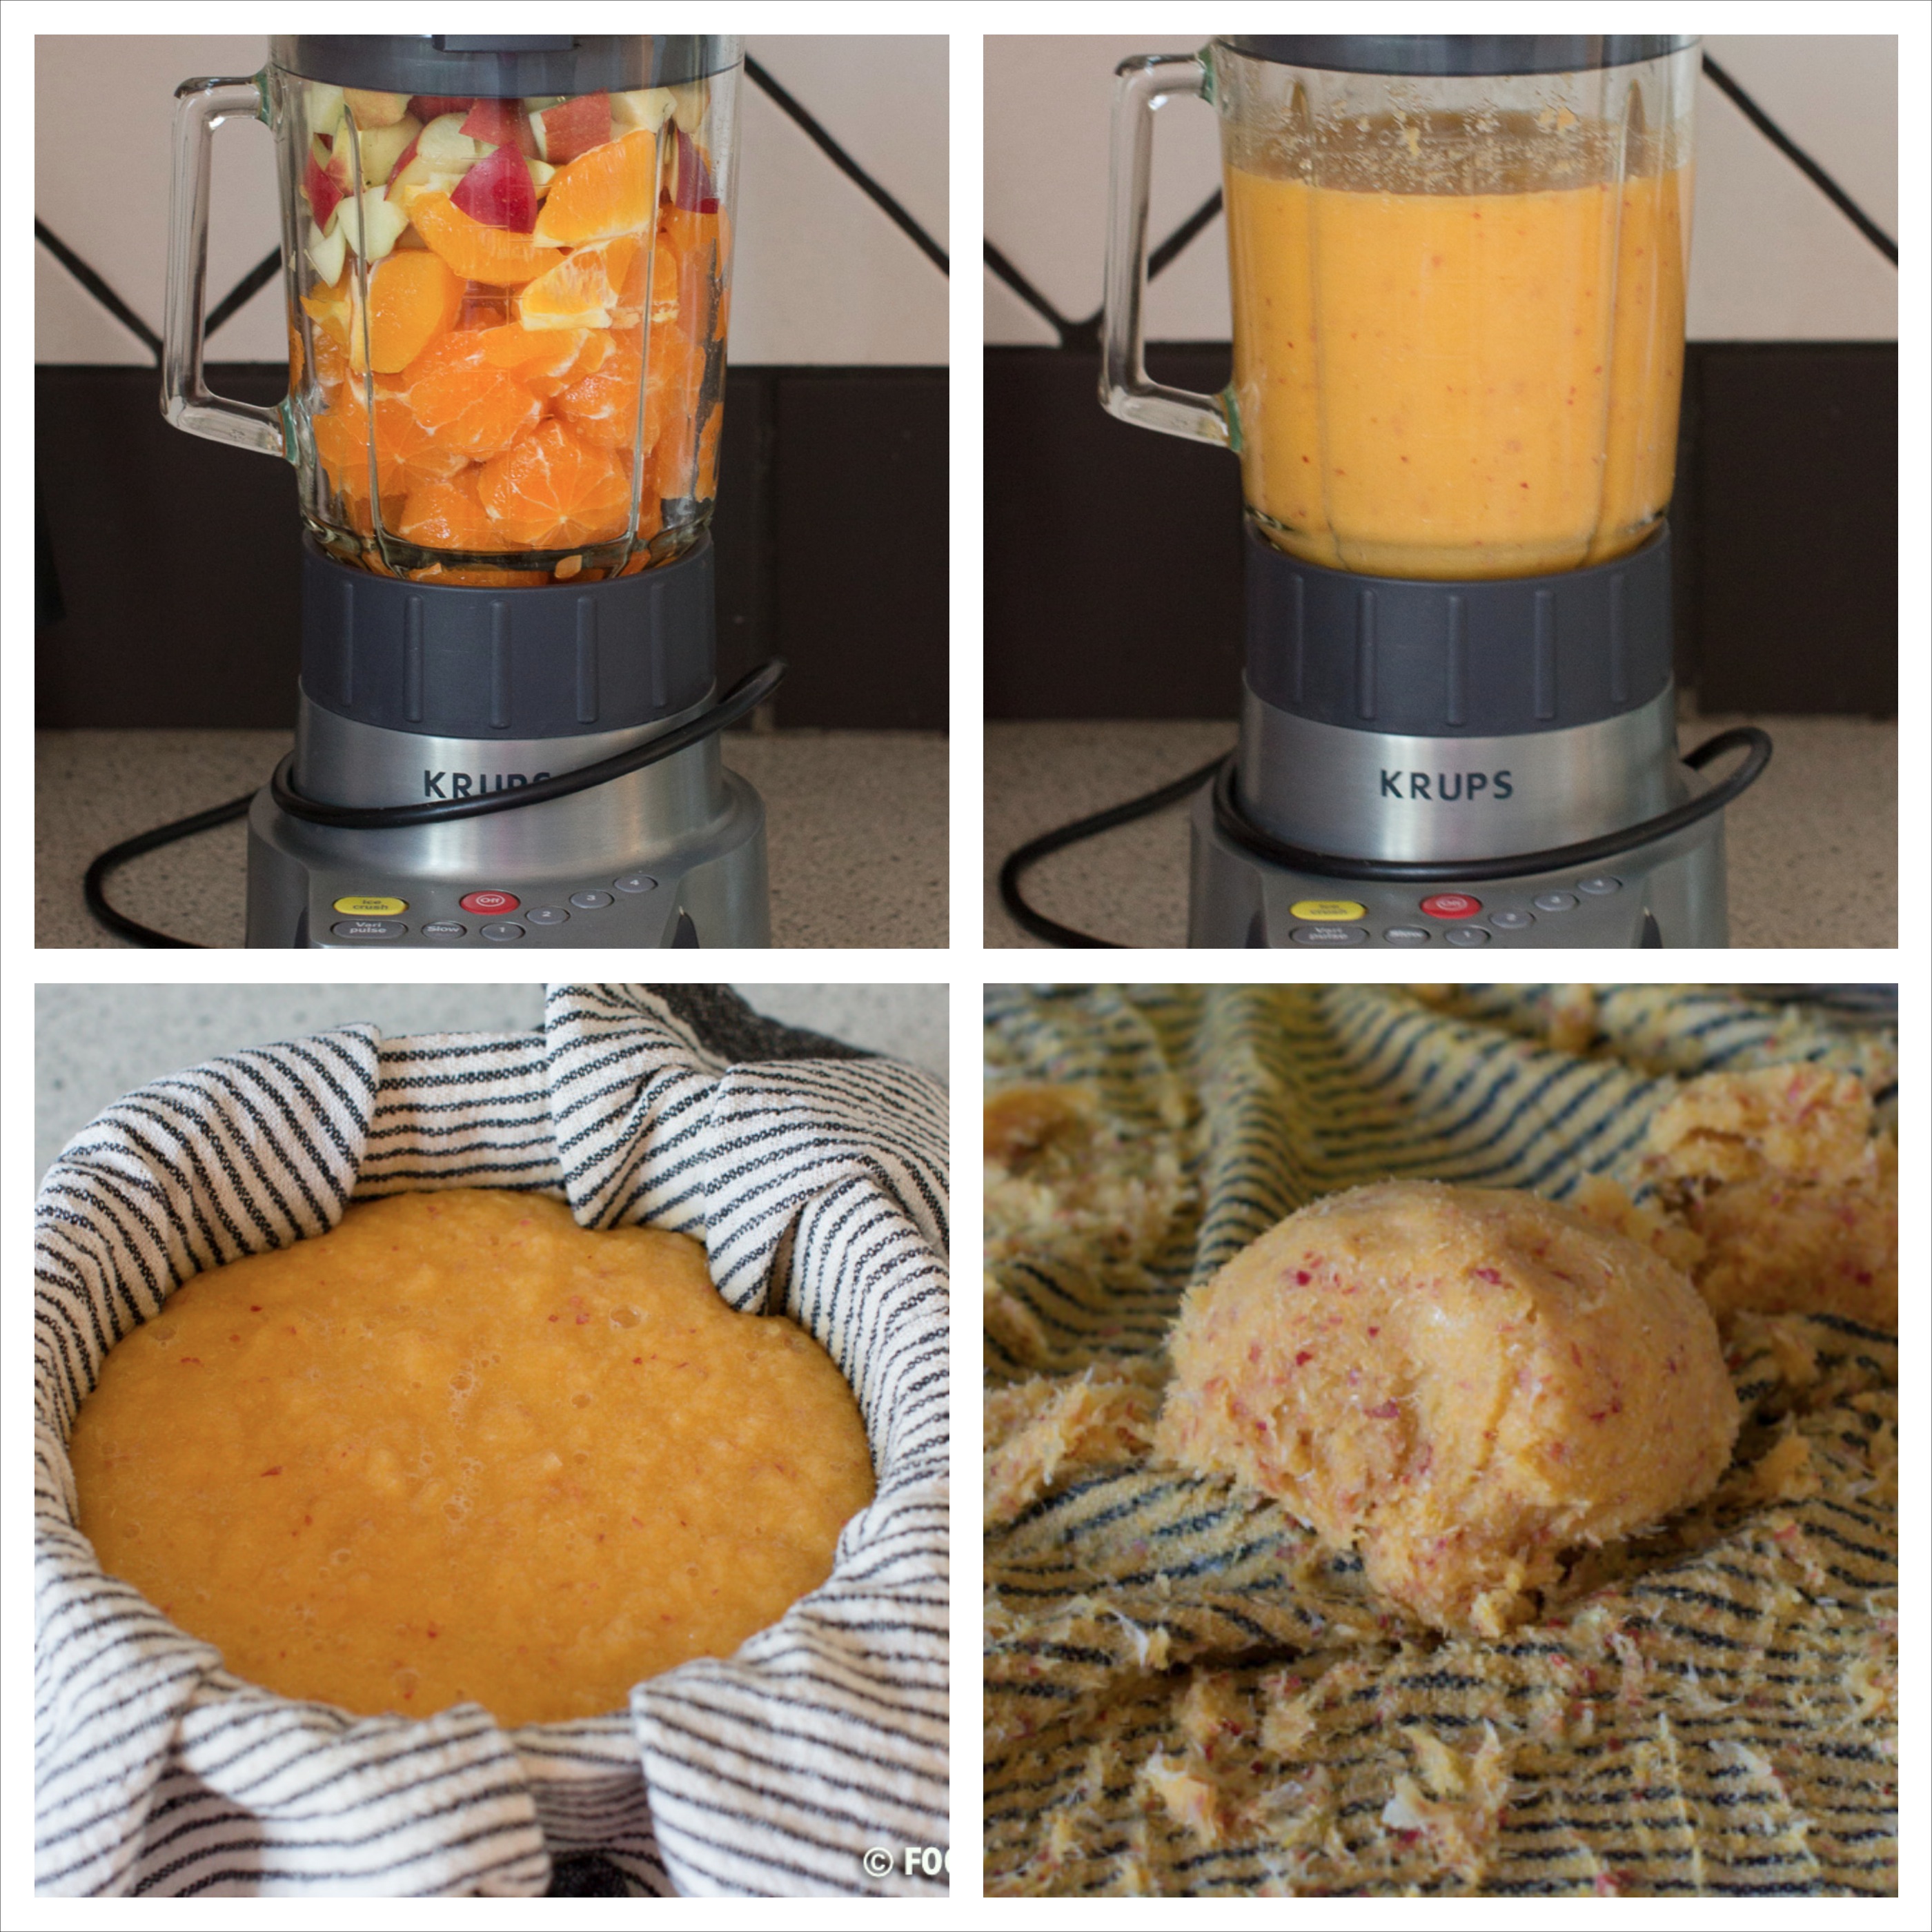
Rinse the apples in cold water, remove the core and chop into smaller pieces. Place in a regular blender together with the cold water. Blend for a few seconds to give space to remaining ingredients (this is not necessary if your blender is big enough to contain it all).
Peel the orange, lemon and ginger, cut it into smaller pieces and add it to the blended apples together with the chili. I have used a Tabasco chili, which gives it a little kick – not too much, not too little, but you can use any chili.
Blend it all well together. I use the ‘liquify’ button on my KitchenAid blender for about 30 seconds.

Ginger & chili juice 1

Find a bowl, a colander and a kitchen towel. It is important that it is a brand new kitchen towel that you only use for juicing and nothing else.
Place the colander in the bowl, cover it with the towel and pour approximately half of your juice batter into the towel.Ginger & chili juice 2

Use one hand to assemble the towel and the other hand to twist it around. Keep twisting to get all the juices out. Remove the all the dry fruit from the towel and repeat the process with the other half of the juice batter.
This portion makes about 3.5 cups (a lille less than 1 liter) and is enough for 4 servings.

Ginger & chili juice 3

Let the juice rest in the fridge for an hour or two if you want a strong ginger taste. Otherwise you can serve immediately in a glass with a few ice cubes.
If you have kids and plan on serving this juice for breakfast, you should consider leaving out the chili and only use half of the ginger.

Serve for breakfast, after a trip to the gym or use it as a natural remedy against a sore throat. This juice can be serves for anything at any time, so there is no excuse for not trying it 🙂

FOOD ON DEMANT (2 of 2)

Bon Appétit Friends!

Ingredients (4 servings)

2 large or 4 medium apples

1 orange

0.5 lemon

1 chili

1 tbsp ginger root

1.25 dl water, cold

Advertisement

Stuffed chicken breast with fresh brussels sprout salad

Hello there followers and other foodies out their 🙂

Before talking about this amazing chicken and salad I would like to say that I am sorry for my unstable blogging the last 8-9 month. As some of you may know my husband Chris and I relocated from Denmark to Atlanta, Georgia in early April to start a new life as entrepreneurs and it has taken a lot of our time and energy. Things rarely goes as planned and we have now turned to entrepreneurial adventure B which will leave me more time for cooking and blogging, which is what I really love spending my time on.
When plan B is ready to be know by the public, I will definitely drag all of you guys and girls into our adventure, so look forward to the next few month where a dream might come true.

Enough about me and my entrepreneurial dream, this blog is about food and today I will show you how to make the most amazing stuffed chicken breast with a fresh and crispy brussels sprout salad. If you think that either you, your better half, children or guests don’t like brussels sprouts, don’t worry… this salad tastes nothing like the steamed brussels sprouts that everybody remember from their childhood. I would even say, that if you serve it to people not telling them what it is, they will love it and ask for the recipe.
Today I serve the salad together with cheese stuffed chicken, but otherwise I like to add a little bit of feta cheese to the salad to give it an extra punch.
Besides this brussels sprouts recipe I can also recommend my honey glazed recipe as well as my other raw brussels sprout salad.

Hope that you will enjoy and please leave a comment if you have any questions or just want to learn more 🙂

Ingredients (4 servings)

Brussels sprout salad

16 oz. brussels sprouts, cleaned

1 bell pepper

1 red onion

3 tbsp olive oil

1 tbsp honey

1.5 tbsp grainy mustard

1 lime, juice

Stuffed chicken breast

4 chicken breasts, organic

6 oz. cream cheese

0.5 red onion

1 chili pepper

1-2 garlic cloves

1 pinch of black pepper

8 oz mushrooms

8 oz bacon, sliced

2 tbsp butter

Salt & pepper

Begin with the chicken breasts. Preheat the oven at 400F/200C and cover a baking tray baking paper followed by a wire rack. Make sure that there is space between the baking tray and the wire rack, this will help the bacon get crisp all the way around.

Chop onion, garlic and chili pepper (I used jalapeños, but if you like a more kick to your chicken choose something with more heat) finely and add it to a bowl with cream cheese and black pepper. Mix it all together and set aside while preparing the mushrooms and chicken breasts.

Stuffed chicken with brussels sprouts salad 2

Clean and slice the mushrooms. Remember never to clean mushrooms by washing them as it will remove a lot of the flavor, use a brush or a little sharp knife instead.
Add the sliced mushrooms to a dry medium-hot pan and sauté until most, but not all of liquid has evaporated. If you add too many mushrooms to the pan at one time, you will risk that instead of the liquid evaporating it will just be released into the pan and boil the mushrooms instead of sautéing them, so if you plan on making a larger portion do you self a favor and divide this process in two.
Transfer the sautéed mushrooms to a chopping board and let cool before chopping them into small pieces.

Stuffed chicken with brussels sprouts salad 3

Season the chicken breasts with salt and pepper. Without cleaning the pan add the butter and let melt at medium heat. Add the seasoned chicken breasts and roast on all sides until light brown, about 2-3 minutes on each side.
Remove the roasted chicken from the pan and make a deep slice into the side of the meat. Stuff the chicken with with your cheese filling and chopped mushrooms and wrap it in bacon.  On the picture below I have used an overload of bacon, but this not necessary. The most important thing is that the stuffing stays inside the chicken and not wether you have used 4 or 8 slices of bacon and how your wrap looks like. Of cause a nice looking wrap will make a better finished impression, but if the bacon gets layered it will be difficult getting it crisp.
Place the wrapped chicken breasts on the prepared baking tray/wire and bake in the oven until the internal temperature reaches 165F/74C which for me takes approximately 35-40 minutes.

Stuffed chicken with brussels sprouts salad 4

While the chicken is baking you have time to prepare the salad.
Cut the brussels sprouts in half and slice them. Clean and slice the pepper bell and red onion too. Add all three to a mixing bowl and use your fingers or two forks to combine it.
In another bowl, mix together olive oil, honey, mustard and lime juice. Mix well to make sure that the honey gets incorporated into the dressing and not left in the bottom of the bowl.
Pour the well mixed dressing over the salad and mix. Leave to rest until the chicken is finished. Stuffed chicken with brussels sprouts salad 1

The salad can also be made in advance if you are entertaining guests or your kids while cooking. Just have in mind that if you want the salad to be fresh and crispy, you will have wait and not add the dressing until last minute. If you on the other hand would like the dressing to get well mixed into the salad you can add it early and let in rest until dinner time. I like it either way so for me it depends on the time.

Stuffed chicken with brussels sprouts salad (8 of 23)

Remove the chicken from the oven when it has reached the wanted temperature and let it rest for a few minutes before slicing it. Arrange on a plate together with the salad and a piece of warm home baked foccacia bread.

Serve with a light beer or a cold glass of white- or rosé wine.

Stuffed chicken with brussels sprouts salad (22 of 23)

Bon Appétit friends!

Ingredients (4 servings)

Brussels sprout salad

450 g brussels sprounts, cleaned

1 bell pepper

1 red onion

3 tbsp olive oil

1 tbsp honey

1.5 tbsp grainy mustard

1 lime, juice

Stuffed chicken breast

4 chicken breasts, organic

125 g cream cheese

0.5 red onion

1 chili pepper

1-2 garlic cloves

1 pinch of black pepper

225 g mushrooms

225 g bacon, sliced

2 tbsp butter

Salt & pepper

Juicy Pork Chops with Sweet and Sour Peppers

Once again we forgot al about time and suddenly it was dinnertime. We are not that good at eating at the same time every night, and most often we use several hours in the kitchen, experimenting and having fun cooking.

Today has been nothing like that. Chris has been working late followed by an hour or two on his other hobby (designing and producing furnitures in metal and old wood), while I (Ann) has been in bed due to neck pains from an old whiplash.

As we had forgotten al about time, we decided to make something easy and quick but still delicious. It took less than 25 minutes (including prepping) and tasted fabulous 🙂


Ingredients (4 servings)

Pork chops

4 pork chops

4 cloves garlic, roughly chopped

1 handful thyme stems

1 tbsp. butter

Salt

Pepper


Sweet & Sour Peppers

1 tbsp. olive olie

2 red peppers

2 yellow peppers

2 red onions

1 jalapeños

1 cup edamamme beans

1 lime, juice and zest

2 tbsp. sugar

1/2 cup red wine vinegar

Salt

Pepper


Begin with prepping the vegetables. Remove the seeds from the peppers and cut them lengthwise. Then cut the onions and the jalapeño into thin slices. We are both chili lovers so we rarely remove the seeds and stems from the chilies, but if you like it more mild, you can remove it (or leave out the jalapeño).

Add olive olie to a frying pan and heat. Then add the peppers, onions, jalapeños and edamamme beans and sauté for 2-3 minutes. Add sugar and sir to combine. When the peppers get a glazed surface add the red wine vinegar and juice and zest from the lemon. Season with salt and pepper. Turn down the heat and let simmer for about 10 minutes or until all the fluid had thickened.

While the sweet and sour peppers are simmering you can make the pork chops. Season the pork chops with salt and pepper. Heat a frying pan and add butter, garlic and thyme. When the butter begins get brown and smell like nuts, add the pork chops and fry for about 4 minutes before turning it. Fry 4 minutes on the other side too, while pouring some of butter over the top. This will give the meat a love nutty taste on the surface and prevent it from drying out in the frying process.

Arrange the sweet and sour pepper mix on a plate and top with a delicious and juicy pork chop and serve with bread or rice.

Image


Bon Appétit Friends!


Ingredients (4 servings)

Pork chops

4 pork chops

4 cloves garlic, roughly chopped

1 handful thyme stems

1 tbsp. butter

Salt

Pepper


Sweet & Sour Peppers

1 tbsp. olive olie

2 red peppers

2 yellow peppers

2 red onions

1 jalapeños

1 cup edamamme beans

1 lime, juice and zest

2 tbsp. sugar

1.25 dl red wine vinegar

Salt

Pepper


Cilantro Heaven and Pesto

Hey there followers,

just wanted to let you know that we are still here and we have not forgotten about you 🙂 On the contrary we have thought about the blog every day since leaving Denmark.

When first arriving to Atlanta on April 1. we had no place to stay and was so lucky that we could stay with some family friends for the first week. The following we stayed at a hotel on downtown and then left for Savannah and Charleston to celebrate my 30th birthday. Being back from our trip we moved in to a nice little town house in Roswell, 20 minutes north of Atlanta. When we moved in we had nothing, and mean nothing, except our two suitcases with cloth.

You might think that it is a womans biggest dream to go and shop for EVERYTHING, and so did I until it was my turn to do it… So instead of buying everything at once we ended up buying the most necessary things to begin with and then buy more as we need it. This has had a huge influence on our cooking and therefore also our blogging. However, we now seems to have enough kitchen stuff to make every day cooking easy and delicious and we will therefore strive to blog as much as possible again.

Cilantro Heaven

Cilantro has been one of our favorite herb for years, but in Denmark it can only be bought in small amounts at well-stocked super markets and then it was pretty expensive – at least compared to the amount needed. Over here, in the US, you can get huge bundles of cilantro on every street corner and I just love it – for me it is like cilantro heaven… And even though I can buy it every were I have sown some seeds and are now waiting impatiently for it begin to grow so that I can go out on out patio and pick it fresh and put in my chicken and cheese panini or as garnish on top of a delicious curry dish.
I buy cilantro every time I get to Farmer’s Market or the local super market and sometimes I get a little to excited and buy too much, which is what happened the other day when I bought 3 bundles when I only needed 1. When I opened the fridge this morning I realized that the last of the 3 bundles looked a little tired and needed to be used immediately or it would go to waste, and as a new thing in my new American life I have decided that nothing should go to waste unless it is dangerous to consume. So I thought “why not make a cilantro pesto?” and so I did…


Ingredients (1 cup)

1/2 cup roasted cashew nuts

2 cups cilantro

1/3 parmesan cheese, grated

2 garlic cloves

1/2 cup + 2 tbsp. extra verging olive oil

1 tbsp. lemon juice

1/2 tsp. salt

1/4 tsp. pepper

Cilantro Pesto 1

Put all the ingredients in a blender and mix at medium speed until smooth. Taste and add more lemon juice if necessary. The same goes for salt.
If you are the type that likes it a bit more chunky, you can stop the blender for every 5 seconds to take a look and stop when it has the wanted consistency.

Place the finished pesto in an air tight jar and store in a dark place. When you have opened the jar the first time, you can help preserve the remains by pouring some olive oil over the pesto, just so it is covered, before closing the jar.

Cilantro Pesto 2

Bon Appétit!

Ingredients (2.5 dl)

1.25 dl roasted cashew nuts

5 dl cilantro

0.8 dl parmesan cheese, grated

2 garlic cloves

1.5 dl extra verging olive oil

1 tbsp. lemon juice

0.5 tsp. salt

0.25 tsp. pepper

Spring Breakfast Eggs and Good News

Followers, I apologize for the lack of blog post the past month – time is running and unfortunately someone decided only to give the day 24 hours. We are in the process of packing down our entire life to move, and not just a few miles but from one continent to another 😀

As I’ve probably mentioned in other posts, I fell in love with the States when Chris brought me to Atlanta back in 2009. We had only been outside the airport for a moment we I said: “this feels like home”, and now  4.5 year later it is going to be my home 😀
I am overwhelmed with happiness that a year long dream became a plan, and that plan finally seems to be reality within the next 5 weeks.

Relocating from one continent to another also means that we are trying to sell as many as our things as possible, so that only few things will have to be shipped. As we also sell our kitchen tools, we will run into some trouble when cooking, so for the next month or two (until we have found something to live in, and bought some kitchen tools) the blog post will be rather simple, contain restaurant review from Atlanta, New York and Austin (TX), and so on….

For those of our followers that live in the US, we would be happy to receive restaurant recommendations, good advice on where to go and where not go – actually we’ll take any good advice at the moment, and will probably also ask many many questions 🙂

And now to the actual content of this post – my favorite breakfast Spring Breakfast Eggs. I make these eggs quite often as they are quick and easy, contain few ingredients and tastes delicious – what more can one ask for?


Ingredients (4 servings)

8 large eggs

1/4 cup cream

1/4 cup aged cheddar cheese, shredded

Salt & pepper

1 tbsp. butter

Herbs for garnish (I’ve used chives, watercress, pee shoots, red window box wood sorrel and nasturtium but choose your favorites).


Whisk the eggs together in a mixing bowl. Melt the butter at medium heat in a frying pan. Add the eggs and stir once in a while to mix. Add cream and shredded cheddar just before you think that your eggs are done, mix to combine and season with salt and pepper.
Turn off the heat and stir until the cheese is melted and the cream is incorporated into the eggs.

Transfer the scrambled egg to a plate and garnish with lots of fresh herbs – I prefer to use seasonal herbs, but choose your favorite (my own favorites are chives, cilantro and pee shoots) 🙂

Serve for sunday brunch with your loved once or make it after a trip to the gym (if you’re like me – “I believe in Fitness” – you can bring the eggs to the gym, to eat within the first 30 minutes after finishing workout).

These eggs is perfect for brunch together with these orange pancakes  and a glass of sweet and colorful carrot and clementine juice.

Spring Eggs

Bon Appétit!

Ingredients (4 servings)

8 large eggs

0.6 dl cream

0.6 dl aged cheddar cheese, shredded

Salt & pepper

1 tbsp. butter

Herbs for garnish (I’ve used chives, watercress, pee shoots, red window box wood sorrel and nasturtium but choose your favorites).


Sweet and colorful Carrot and Clementine Juice

As you might have guest I have a juice period 😀 I make juice of whatever fruit or vegetable we have in the fridge and until now they have all turned out to be delicious!! One of the more untraditional juices I have made recently is my green vitamin bomb with kale, pineapple and ginger. It might sounds strange, but I promise that it tastes wonderful and has a pretty grass-green color.
Not all my juice recipes has been documented – yet – as I make it as often as possible and not always has the time to take pictures. Even though I make juice several times each week I still haven’t made no. 1 juice on my to-do juice-list: beet root juice! And the only reason for this is, that I don’t have any latex gloves at the moment and as I use my hands to squeeze the juice they will get all purple for several days to come…

Well, as with all our other recipes I hope that you will enjoy this one and feel free to leave an comment with your thoughts and/or suggestions 🙂


Ingredients (4 cups)

10 large clementines

4 large carrots

2 large apples


Peel the clementines and remove the core from the apple and cut it into smaller cubes. Wash the carrots and cut the top end off before slicing it into smaller pieces. I prefer to keep the skin on carrot as it contains a lot of vitamins, but make sure that you have washed all the dirt off – otherwise I’ll recommend that you peel it.

Carrot and Orange Juice 1_Fotor_Collage

Add all the fruit and carrot pieces in a blender and blend at medium speed for 4-5 minutes. Pour the mixture into a tea towel covered bowl and gather the corners of the tea towel. Use both hands to twist the tea towel around and squeeze all the juice out of the mixture. You will end up will approximately a little less than 1 cup of dry fruit/vegetable waste.Carrot and Orange Juice 2_Fotor_CollageServe immediately with a few ice cubes or fridge for while until cold. The freshly squeezed juice can stored in the fridge for up to 48 hours.

Carrot and Orange Juice 6Bon Appétit!


Clementine and Orange Juice – true sunshine

I don’t know about you, but I really need to experience some sunshine very soon! The Danish winter weather has been so wired this season – it has been like a yearlong autumn with rain, storms and grey skies and it is not until recently that we have gotten a bit of snow. Actually some one told me the other day that we have only had 10 hours of sunshine in January… WTF ….!!! No wonder that I miss the sun and all it brings (including the important D-vitamines).
Well, if the sunshine won’t come to me and I don’t have time to vacationing right now, I will have to ‘settle’ with this PERFECT clementine and orange juice. It has a strong and still mild taste of summer and sunshine.


Ingredients (4-5 cups)

8 small clementines

2 large oranges

2 large apples


Peel clementines and oranges. I use a knife, but if you want to get as much out of the fruits as possible you can peel it using you fingers instead. Then remove the core of the apple and chop it.

Orange and Clementine Juice 1_Fotor_Collage

Place all the fruit in a blend and blend until smooth – it takes approximately 3-4 minutes at medium speed. Cover a mixing bowl with a tea towel and pour the blended fruits in the bowl. Assemble the towel and squeeze with both hands until all the juice is in the bowl and all you have left is the dry fruit meat. Orange and Clementine Juice 2_Fotor_Collage

Serve the freshly squeezed juice immediately with a few ice cubes or place it in the fridge to cool down before you serve it. I make it just before serving and even though I always store my fruit in the fridge, the end product still needs cooled down so I use ice cubes. Orange and Clementine Juice 9

Bon Appétit!

Green Vitamin Bomb

It seems to be juice week in our household this week! The past weekend I made apple/carrot juice and ginger/kale juice and yesterday I made a ginger/cranberry juice. Today I have made vitamin bomb with pineapple and kale that taste so wonderful that I’m sorry that I only made one portion (4 glasses) 🙂

When I tell people that I add kale to my juice, they look at me like I’m crazy! But take a moment a think about it… Kale a one of the healthiest vegetables to can spoil you body with. It contains, both protein, fibers, vitamins and minerals and studies have shown that kale contains substances that can help smother cancer cells!

If you want the juice to more clear in color and thin in consistency, you can just pour the juice into the towel and let it drip off – it takes from 2-6 hour and you will only get half the amount of juice + you will leave many of the healthy ingredients in the waste product. I therefore recommend that squeeze it as much as possible so that almost nothing is left for the trash can!

Hope the you will try one of my own favorite juices and you are welcome to leave a commend with your thoughts and/or suggestions for other juices 🙂


Ingredients (4 cups)

3 large apples, chopped

2 cup pineapples, chopped

2 tbsp. ginger, chopped

2 lemons, juice

2 large handfuls kale, rinsed

1 cup water


Pineapple and Kale Juice 1_Fotor_Collage

Place chopped apples, pineapple and ginger in a blender with lemon juice and water.

Blend for 1 minute or until the ingredients begin to form a smooth consistency. Add 1/2 of the rinsed kale (remember to rinse the kale very carefully as it often contains a lot of dirt) and blend again. Add the remaining kale and blend for a few minutes until the juice has a beautiful green color.

Cover a mixing bowl with a tea towel and pour half of the juice into the towel. Twist the towel and squeeze all the juice into the bowl. Do the same with the other half of the juice. Squeeze as much as you can – the waste product should be dry.

Serve the juice immediately with a few ice cubes in each glass or fridge for up to 24 hour.

Pineapple and Kale Juice 2_Fotor_Collage Pineapple and Kale Juice 11Bon Appétit!

Ingredients (1 liter)

3 large apples, chopped

5 dl pineapples, chopped

2 tbsp. ginger, chopped

2 lemons, juice

2 large handfuls kale, rinsed

2.5 dl water


Demant’s Cranberry Energizer

Processed juice or fresh home made juice?? Well, I definitely know what I prefer but until a few weeks ago I had never made a single juice myself! I insisted on buying a juice maker before make my own juices, but then suddenly I realized that that I didn’t need a juicer – all I needed was my fantasy, some extra tea towels and a washing machine 🙂

During that that week I have made several different juices using all sorts of fruits and vegetables and they have all been a success when served for breakfast or as today, after 2 hours in the gym.

Try this recipe which is filled with vitamins, minerals and antioxidants or make your own version with whatever fruits and vegetables you have in the kitchen (I can reveal that kale gives a beautiful green color and is one of the best vegetables you can serve, if you want to spoil your body).

Ingredients (2 cups)

4 apples

2 carrots

2 inches ginger

1/2 cup cranberries, fresh

1 lemon, juice

1 cup water, cold


Cut the apple into quarters and remove the core. Cut off the top of the carrot and peel the ginger. Cut apples, carrots and ginger into smaller pieces and place it all in a blender together with lemon juice, cranberries and water.

Cranberry Energizer 1_Fotor_Collage

Blend until completely combined and you can begin to se all the juices from the fruits and vegetables being released.
Cover a mixing bowl with a clean tea towel (I a few that are only used for juices or other similar processes) and pour the blended mixture into the tea towel.
Assemble the tea towel so that you can twist it and squeeze all the juice into the bowl. Keep squeezing into to only have a handful of dry vegetable/fruit leftovers in the towel. Pour the juice into a decanter and serve immediately with a few ice cubes or fridge to cool. Fridge for up to two days and remember to stir a few times before serving.Cranberry Energizer 2_Fotor_Collage

Pour the juice into a decanter and serve immediately with a few ice cubes or fridge to cool. Fridge for up to two days and remember to stir a few times before serving.

Serve for breakfast with warm honey buns or together with a handful of almonds and raisins after a couple of high intensive training 🙂

FOOD ON DEMANT (35 of 35)Bon Appétit!

Ingredients (0.5 liter)

4 apples

2 carrots

2 inches ginger

1.25 dl cranberries, fresh

1 lemon, juice

2.5 dl water, cold


Creamy Beet Soup

Soup, soup, soup and more soup… I have experimented with soups this December and I must admit that I have made some pretty awesome variation with the vegetables in season.
Years ago we never thought about using what was in season – we just bought whatever ingredients was necessary to make what we wanted for dinner. Today we most often pick our vegetables at the local farmers market where we can get fresh seasonal vegetables, which makes it a lot more fun than buying them in the local super market where it have been lying for days. What would be even better is to grow the vegetables our selves, but as we live in an apartment it is quite difficult for us to grow anything else than herbs, tomatoes, cucumbers and chilies. To our luck, my parents have a garden where we can grow potatoes, beets, celeriac, zucchinis, onions, brussels sprouts, carrots, strawberries, raspberries, black currant and apples 🙂 Or to be honest, my parents grow it and we eat it!

The beets and onions for this soup is bought while the celeriac and jalapeños is home grown and the vegetables stock home made from vegetables residues.

Hope that you will enjoy the soup 🙂


Ingredients (4 serving)

26 oz. celeriac, peeled

26 oz. beet roots, peeled

8 oz. onions

1 jalapeño


1 tbsp. vegetable oil

1 tsp. cayenne pepper (optional)

2 tsp. dried coriander

1 lemon, juice

5 cups vegetable stock

1/3 cup sour cream

1/4 cup bacon, fried

1/4 cup cashew nuts, roasted

Salt & pepper


Chop celeriac, beets and onions in 1/2-inch pieces and the jalapeños in slices.
Warm the oil in a sauce pan and add all the vegetables. Sauté for 4-5 minutes until all vegetables has adapted the beautiful color from the beets.

Add cayenne pepper, dried coriander and lemon juice and stir to combine.

Beet Soup 1_Fotor_Collage

Add vegetable stock and bring to a boil, then turn down the heat and let simmer for 30 minutes.

Transfer to a stand blender and blend until smooth. Taste and season with salt and pepper. Add more vegetables stock or water for a thinner consistency.

Beet Soup 2_Fotor_Collage

Pour the soup in small soup bowls and garnish with sour cream, fried bacon and roasted chopped cashew nuts.
Serve on a busy and cold week night or as a starter when having friend or family over for a three course dinner 🙂

Beet Soup 8

Bon Appétit!

Ingredients (4 serving)

750 celeriac, peeled

750 beet roots, peeled

225 g onions

1 jalapeño

1 tbsp. vegetable oil

1 tsp. cayenne pepper (optional)

2 tsp. dried coriander

1 lemon, juice

1.25 liter vegetable stock

0.8 dl sour cream

0.6 dl bacon, fried

0.6 dl cashew nuts, roasted

Salt & pepper