30 Minute Duck Salad

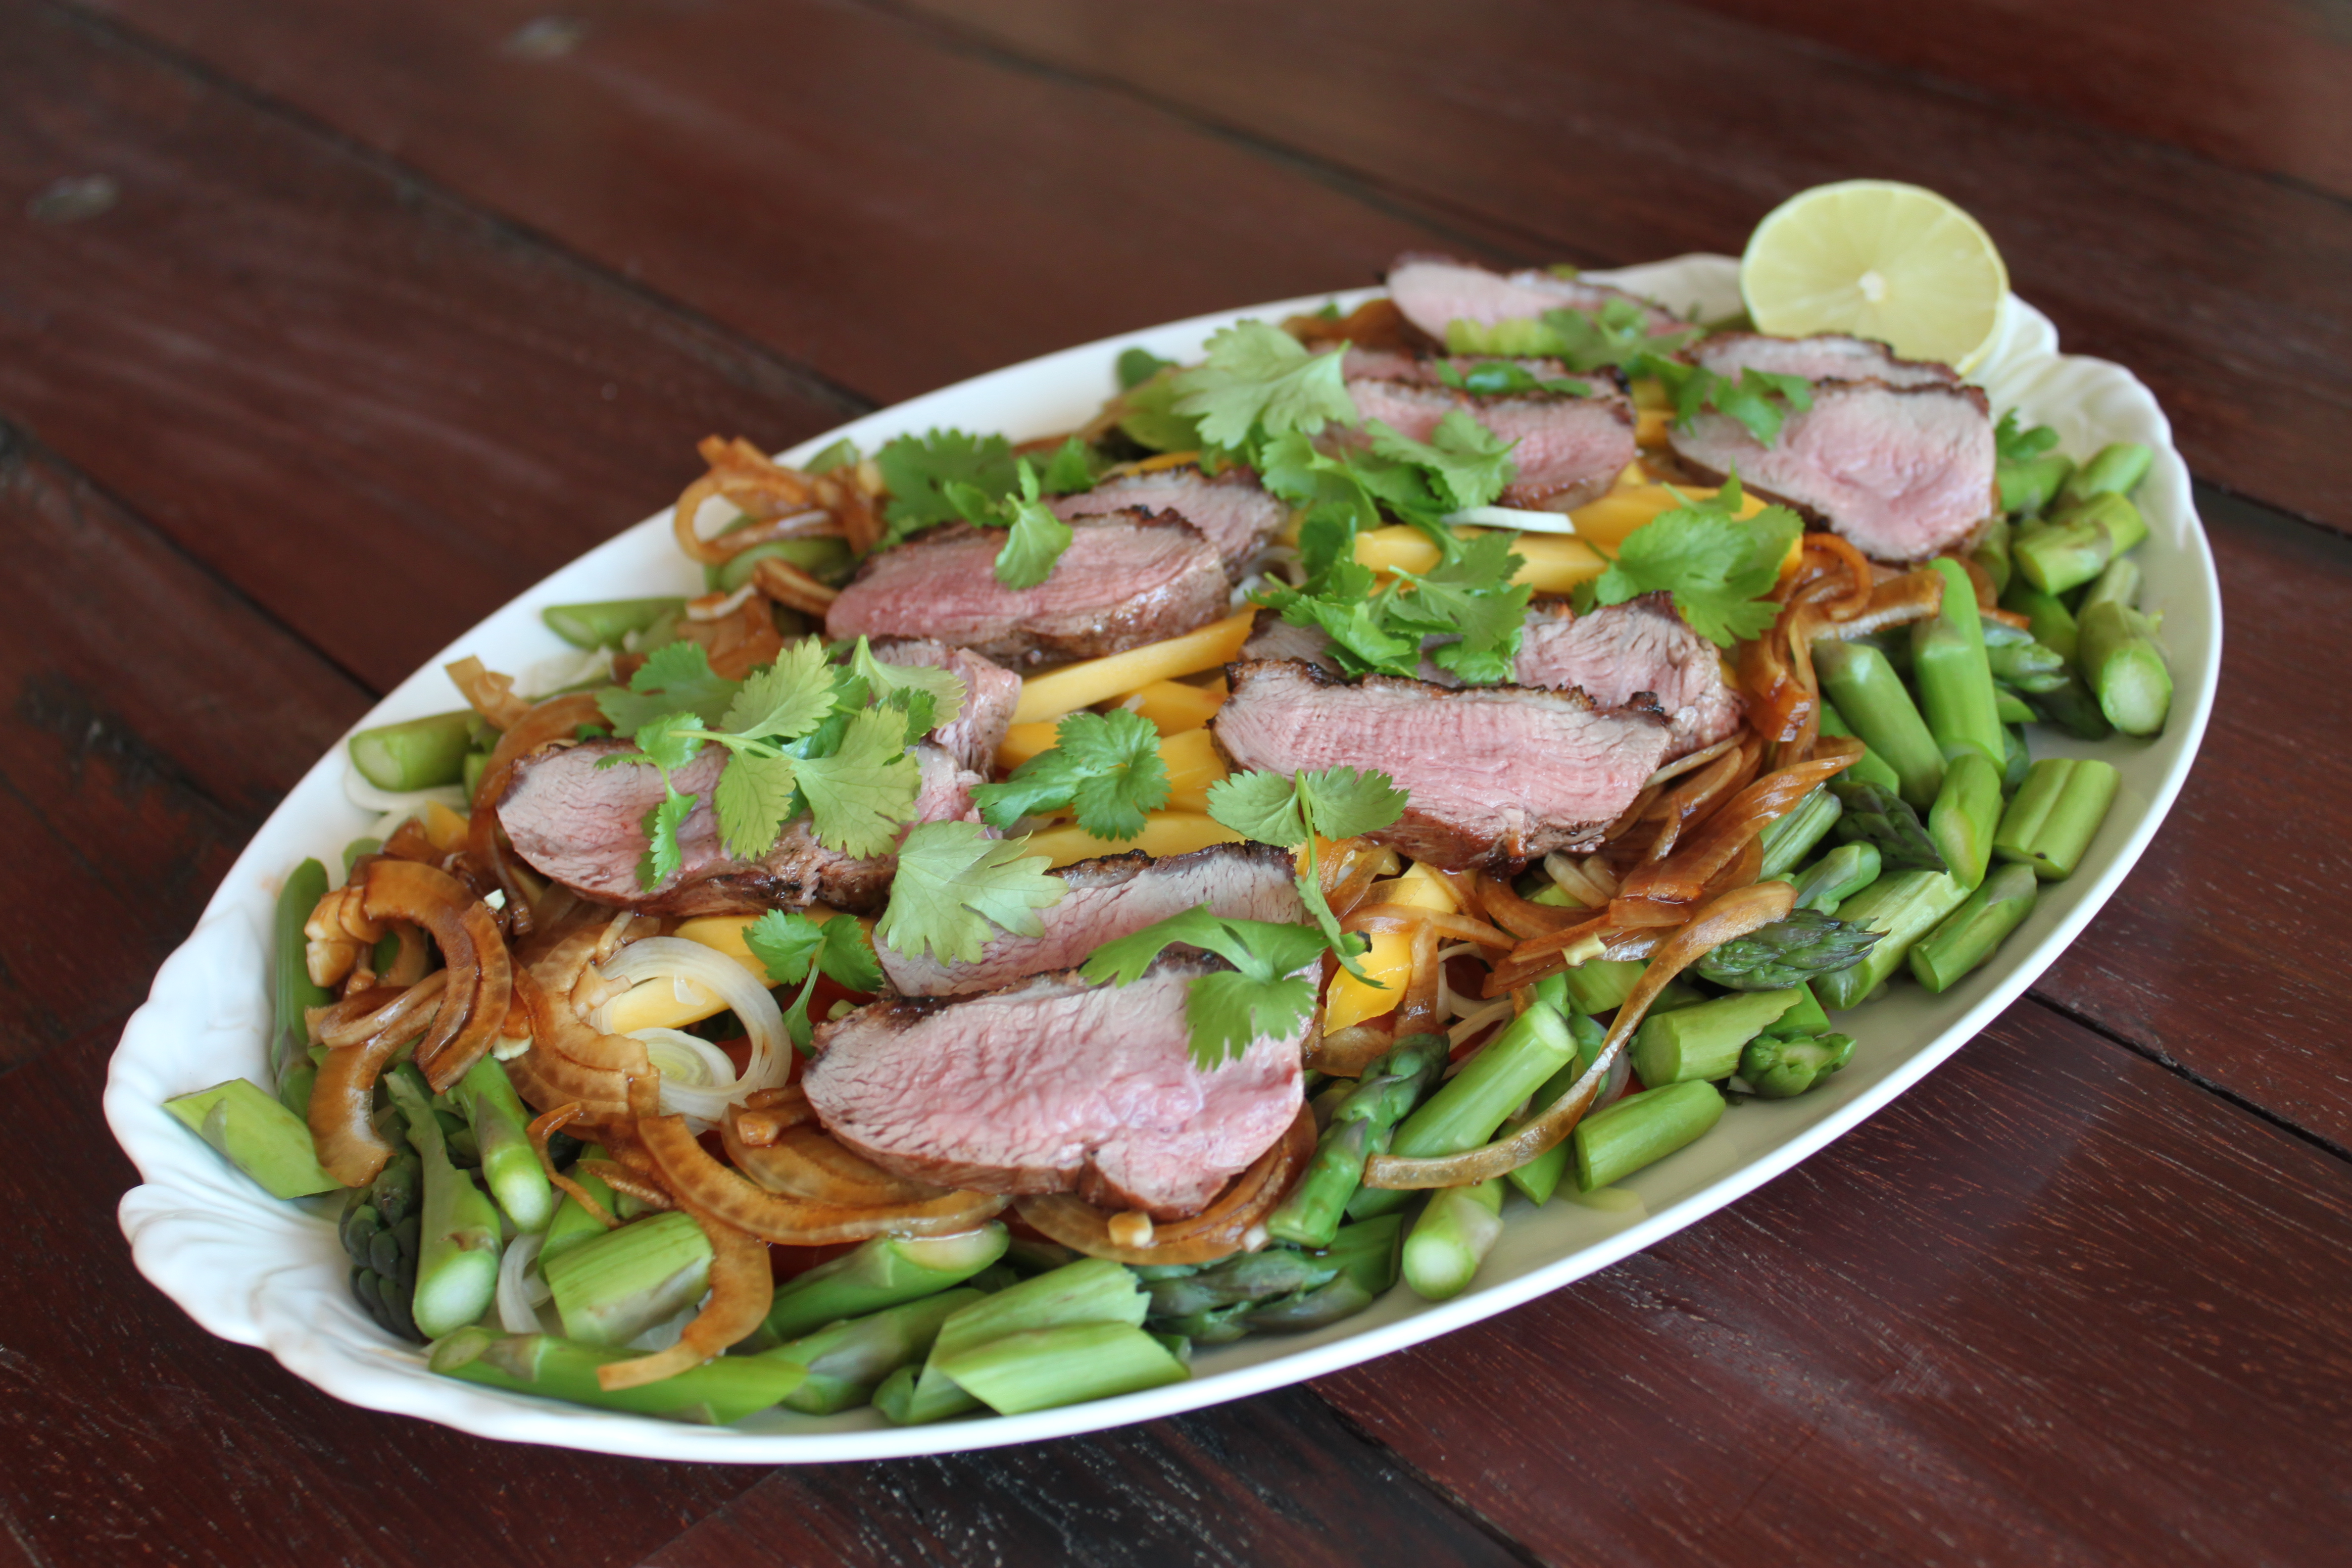
Last night we were both feeling tired and decided that dinner was going to be something fast and and easy but still delicious. We look in the fridge and found ingredients for out favorite duck salad and decided to make it.

One of the great things about this sale is, that it takes less than 30 minutes to make and it tastes fabulous 🙂 The combination of the juicy duck meat together with all the crispy vegetables and the sweet mango and perfumed cilantro gives it a bit of an Asian twist without it being to much.

The recipe below is for a 2-persons main course, but you can use it as an appetizer to, which will cover 4-6 servings instead.


Ingredients (2 servings)

1 duck breast

Salt

Pepper

2 handfuls rucola salad

1/2 leek

6 cherry tomatoes

10 asparagus

1/2 cucumber

1/2 mango

1 onion

1/2 cup soy sauce

1/4 cup cilantro


Clean the duck breast and remove tendons and blood vessels if any. Heat up a frying pan and make small cuts in the duck skin; season with salt and pepper. Place the duck breast with the skin side down, when the pan is smoking hot. Turn down the heat and fry on the skin side for 8-10 minutes. Turn the duck breast and turn off the heat. Let fry for additionally 2-3 minutes before removing the it from the pan. Let rest (on the meat side) on a plate for 10 minutes before cutting it into 1/2 inch slices.

While the duck is frying and resting, you have time to prep the vegetables. Clean the rucola salad and leek in cold water and let it drip off in a colander.

Slice the onion in paper thin slices and place them in a bowl and cover with soy sauce. Set aside until the rest of the vegetables are prepared.

Clean the asparagus and cut them into bit size pieces and blanch in boiling water for 30 seconds. Rinse the asparagus in cold water to avoid that they get soft.

Slice the tomatoes, mango, cucumber and the cleaned leek into thin slices.

Arrange the salad on a nice plate beginning with the rucola salad, followed by the cucumber-, tomato-, and leek slices. Then add the blanched asparagus and the soy-marinated onion slices and finish off with the mango slices.

When the duck breast has been resting for approximately 10 minutes, you can slice it. Place the slices on top of the salad and sprinkle with cilantro.

Serve with a good cold beer 🙂

IMG_6642

Bon Appétit!

Ingredients (2 servings)

1 duck breast

Salt

Pepper

2 handfuls rucola salad

1/2 leek

6 cherry tomatoes

10 asparagus

1/2 cucumber

1/2 mango

1 onion

1.25 dl soy sauce

0.8 dl cup cilantro


World Class Chocolate Cupcakes with berries

This past saturday I was invited to s bachelorette party but was prevented due to other activities that day. It was asked if anyone could bring a cake for the afternoon coffee and even though I has other plans for that day, I volunteered. I decided to make these cupcakes filled with Amedei Toscano White and raspberries, as I find it to be the perfect summer cupcake and we truly need to see some summer here in Scandinavia soon!!

The bride to bee, was very happy with the cakes and so was my mother who got a few too (and she doesn’t even like white chocolate and strawberries), so it will definitely not be the last time I make them 🙂


Ingredients (14 cupcakes)

Cupcakes

1 stick butter, room temperature

1 cup + 1 tbsp. granulated sugar

3 eggs, room temperature

1 tsp. vanilla extract

2 cups of flour

11/2 tsp. baking powder

1/4 tsp. salt

1/4 cup buttermilk

1 lemon, zest

1/2 cup white quality chocolate, chopped

1 cup raspberries, frozen


Frosting

1 pound cream cheese, room temperature

1/5 cup confectioners sugar

1 tsp. vanilla extract


Decoration

14 strawberries

28 raspberries, fresh

28 blueberries, fresh


Place butter and sugar in a mixing bowl and whisk until light and fluffy. scrape the sides of the bowl if necessary. Add the eggs one at time and whisk until incorporated. then add the vanilla extract.

combined flour, baking powder and salt in another mixing bowl. Add the flour mixture to the butter and eggs mixture alternating with the buttermilk. Scrape the sides of the bowl again, if necessary.

Add the lemon zest and the chopped white chocolate, and fold until evenly combined. When I want you to fold and not whisk, it is to make sure that the batter keeps the fluffy consistency it got in the last step. If you over-whisk, you’ll risk to loos the fluffiness and the cupcakes will get heavy.

Line standard muffins tins with paper liners. Fill each paper line with 1 tsp. of the batter. divide the frozen raspberries in the middle of the batter. Then divide the remaining batter on top of the raspberries and bake at 400F for approximately 18 minutes or until a toothpick comes out clean.

IMG_6637

Frosting

Place all three ingredients in a mixing bowl and whisk until smooth and fluffy. Put the frosting in a piping bag with your favorite piping tip (this one is Wilton M1) and decorate the cakes.

To finish of the cakes, decorate with one strawberry and two raspberries and blueberries. Serve in the afternoon with a great cup of coffee or as a dessert with a glass of sparkling wine.

IMG_6635

Bon Appétit!

Ingredients (14 cupcakes)

Cupcakes

113 g butter, room temperature

225 g granulated sugar

3 eggs, room temperature

1 tsp. vanilla extract

500 g flour

1 1/2 tsp. baking powder

1/4 tsp. salt

0.5 dl buttermilk

1 lemon, zest

80 g white quality chocolate, chopped

20 raspberries, frozen


Frosting

450 g cream cheese, room temperature

25 g confectioners sugar

1 tsp. vanilla extract


Decoration

14 strawberries

28 raspberries, fresh

28 blueberries, fresh


Biscuits with a Bite

This id our third post on biscuits and we can assure you that it won’t be the last 😀 The basic recipe is a Southern biscuit to which we all all kind of ingredients like e.g. cheddar, rosemary, thyme or as this time jalapeños.

These were made because we had forgotten to by a baguettes for last nights dinner and we wanted to use the remaining jalapeños we had in our pantry. They turned out to be really good and the chili flavor from the jalapeños makes it a bit spicy but not hot. If you are a afraid that the biscuits gets to hot, you can remove the seeds from one of the jalapeños, when you make them the first time (cause we know that you will make them again)! Hope that you will like them as much as we do 🙂

Enjoy!


Ingredients (12 biscuits)

2 1/2 cups + 2 tbsp. flour

2 1/2 tsp. baking powder

1/2 tsp. salt

1 tbsp. granulated sugar

1/2 cup cold butter, cut into small pieces

3/4 cup milk

3 large eggs

2 jalapeños, chopped

In a large mixing bowl, sift together flour, baking powder, salt and sugar. Cut the butter into the dry ingredients and whisk until the mixture resembles coarse crumbs. Add the chopped jalapeños and whisk again.

Beat 2 of the eggs slightly and add to the mixture together with milk. Knead until just combined and it has a sticky and moist texture.

Place the dough on a slightly floured surface. Knead until smooth.

IMG_6621

Roll out the dough to about 1/2 inch thickness. Fold the dough halfway over and roll again. Do this 4-5 times. Be careful not to roll all the air out of the dough. Cut the biscuits with a 2 1/2 inch cookie cutter.

IMG_6626

IMG_6628

Place the biscuits close together on a piece of baking paper. Beat the last egg slightly and brush the top of the biscuits.

Bake at 400F for about 18-20 minutes or until the tops are golden brown and a toothpick comes out clean.

Let cool for a few minutes before serving. These were served with baby back ribs and a leek and tomato salad, but you can serve them with all sorts of meat or salads :-)

IMG_6630Bon Appétit!

Ingredients (12 biscuits)

312 g flour

2 1/2 tsp. baking powder

1/2 tsp. salt

1 tbsp. granulated sugar

113 cold butter, cut into small pieces

1.8 dl milk

3 large eggs

2 jalapeños, chopped


Cheddar Biscuits

Biscuits, biscuits and more biscuits…. We both love biscuits and we make then quite often. Sometimes because they are the best choice for the food served and other times, because we have forgotten to by/bake some bread and don’t have the time to wait for the dough to  raise.

You can add all kind of things to your biscuits. Leaving out the cheddar cheese from this recipe, and you will get some plain and simple (but incredible delicious) Southern biscuits or you can add chilies, thyme or something else of your choice. In time we will make a whole range of different biscuits with the same basic recipe, and you are welcome to come with suggestions 🙂


Ingredients (12 biscuits)

2 1/2 cups + 2 tbsp. flour

2 1/2 tsp. baking powder

1/2 tsp. salt

1 tbsp. granulated sugar

1/2 cup cold butter, cut into small pieces

3/4 cup milk

3 large eggs

1/2 cup mild cheddar cheese, shredded

1/2 cup aged cheddar cheese, shredded

In a large mixing bowl, sift together flour, baking powder, salt and sugar. Cut the butter into the dry ingredients and whisk until the mixture resembles coarse crumbs. Add shredded cheddar and whisk again.

Beat 2 of the eggs slightly and add to the mixture together with milk. Knead until just combined and it has a sticky and moist texture.

Place the dough on a slightly floured surface. Knead until smooth.

Roll out the dough to about 1/2 inch thickness. Fold the dough halfway over and roll again. Do this 4-5 times. Be careful not to roll all the air out of the dough. Cut the biscuits with a 2 1/2 inch cookie cutter.

Place the biscuits close together on a piece of baking paper. Beat the last egg slightly and brush the top of the biscuits.

Bake at 400F for about 18-20 minutes or until the tops are golden brown and a toothpick comes out clean.

Let cool for a few minutes before serving. These were served with baby back ribs and wasabi coleslaw, but you can serve them with all sorts of meat or even as a breakfast bun 🙂

IMG_6573

Bon Appétit!

Ingredients (12 biscuits)

312 g flour

2 1/2 tsp. baking powder

1/2 tsp. salt

1 tbsp. granulated sugar

113 g cold butter, cut into small pieces

1.8 dl milk

3 large eggs

1.25 dl mild cheddar cheese, shredded

1.25 dl aged cheddar cheese, shredded


Jalapeños Hot Sauce

A few days ago we made a bucket full of chili cheese top (recipe comes later this week) and we thought that it was a pity to through away the inside of the jalapeños. Thus we decided to try and make a jalapeños hot sauce, and the end result was so good that we decided that we would share it with all of you guys 🙂

The recipe is quite easy to follow and it doesn’t take long to make. So do you have jalapeños leftovers after dinner, you can freeze them and when you have enough, you can make delicious homemade hot sauce to be served on top of tacos or to spice up your daily cooking. Have you used a properly cleaned jar, the hot sauce can be stored for up to 6 month in a cool and dark place (ours doesn’t last for more than a few weeks, as we looooove hot sauce :-D).


Ingredients (about 3 cups)

50 jalapeños

6-7 garlic cloves

1 large onion

1 tbsp. salt

3 cups water

1 cup apple cider vinegar


Remove the stem form the jalapeños and slice them (as described above, and as you can see the first picture, we have used all the leftovers from our chili cheese tops so we have only added 4 whole jalapeños).

Chop the onion and garlic roughly and place in a sauce pan together with salt, jalape̱os and water. Bring to a boil and cook at medium heat for 20 Р30 minutes or until most of the water has evaporated. Stir occasionally to avoid burning.

IMG_6585

IMG_6587

Remove the cooked jalapeños mix from the heat and let it cool a bit before transferring it to a blender. Use a rubber spatula to get all the chili mix from the sauce pan and into the blender. Blend on medium speed while slowly adding the vinegar. Scrape the sides of the blender if necessary. Blend for 2-3 minutes.

Pour the chili sauce back into the sauce pan and bring to a boil again and cook for approximately 10 minutes or until the sharpness of the vinegar is gone.

Depending on your consistency preference you have two options now: 1) you can leave it as it is now and transfer it to a clean jar, or 2) you can transfer the chili sauce through a stainer and into a cleaned jar. This is done to remove any small seeds that did not get blended completely. The difference between the two methods, is the consistency of the end result. Using the last method you will get a very thin hot sauce like e.g. Tabasco, while the first methods gives a thicker and more grainy consistency.

We have chosen the second method as we like it thin, but if you prefer it slightly thicker you can just do that 😀

IMG_6589

Bon Appétit!

Ingredients (about 7.5 dl)

50 jalapeños

6-7 garlic cloves

1 large onion

1 tbsp. salt

7.5 dl water

2.5 dl apple cider vinegar


Guess what it is… GIVE-AWAY!

The first give-away from Food on Demant is going to be a ‘guess what this is’ give-away 😀

During the years we have developed a number of kitchen tools to help ease the cooking. Below you can see two pictures of tools which we recently developed. As you’ll have to guess what the tools are for, we can “unfortunately” not reveal anything about the purpose of these two tools, but we look forward to hear what you think it is for 😀

To participate in the give-away, you’ll have to leave a comment with what you think the tools are for. The give-away will run until sunday (May 19th) where there will be a random draw between all comments 🙂

Image

Image

As we have readers/followers from all over the world, the give-away will have to be something that can be send by post. Therefore we have decided that the give-away is going to be 4 plates of Amedei Chocolate. Chocolate from Amedei is not just chocolate – it is definitely the world’s best chocolate 🙂 We could tell about the delicious taste, its creaminess, aroma etc., but the best way to get to know it, is to taste it – so leave a comment and participate in the competition 😀

amedei-cover

Feel free to spread the word to your friends and other bloggers, so they will get the change to taste this fabulous chocolate too 🙂 We hope to get a lot of comments and we look forward to spreading the taste of quality chocolate to one of you 🙂

Chris & Ann 🙂


THE GIVE AWAY IS NOW OVER AND WE ARE READY TO REVEAL WHAT THE TOOLS ARE FOR 🙂

First of all, we want to thank you for your contribution in the contest. You have come with some quite interesting suggestions for the use of the two tools and a few of you have got it right 😀

As you can see o the pictures below, the large round tool is a Chili Cheese Rack while the small long tool is used for getting the stem and seeds out of the chilies!

IMG_6526 IMG_6422

IMG_6423

As promised we made a random draw between all comments, and the winner is comment no. 6, so congratulation to Susanne 😀 Would you please send and e-mail to foodondemant@gmail.com with your address and your chocolate preferences?

Once again, thank you for participating in our give away 🙂

Chocolate Turtle Cupcakes

As I wrote in the last post, it is Mother’s Day today. For my own mother I made baked rhubarbs with vanilla cream – delicious!

These cupcakes was for my best friend mother. I have known the family since 1986 and they have always been as a second family to me, so I decided to bake a cake for the woman who always made me grilled cheese and who’s door has always been open to me – thank you Connie.

Hope that we will have many more Christmas’ together 🙂


Ingredients (12 cupcakes)

Cupcakes

1/3 cup unsweetened cocoa powder

1/3 warm water

1 1/4 cup sugar

1 cups flour

1 tsp. baking powder

1 tsp. salt

1 sticks butter

2 eggs, room temperature

1 tbsp. vanilla extract

1/2 cup sour cream

1/2 cup dark quality chocolate (70%)

24 mini chocolate turtles (Toms)


Swiss Meringue Buttercream (24 servings)

1 cup sugar

5 large egg whites

1/4 tsp. salt

1 tbsp. vanilla extract

1 pound butter, room temperature (preferably organic)


Decoration

24 rasberries

12 spearmint leafs.


Cupcakes

Melt butter and sugar in a sauce pan. Stir to combine. When melted and combined, transfer to a mixing bowl and whisk at medium speed until cooled.

In another bowl mix together cocoa powder, flour, salt, baking powder and baking soda.

When the butter and sugar mixture is cooled, add one egg at a time and whisk between each. Then add vanilla extract.

Shift in flour mixture in four batches, alternating with the sour cream, and warm water and whisk until just combined.

Melt the chocolate in a heat proof bowl, over a pan with simmering water. Add the melted chocolate to the batter and stir to combine.

Line standard muffins tins with paper liners. Fill each paper line with 1 tsp. of the chocolate batter. Then chop 1 chocolate turtle at at time and lie in the middle of the batter. Then add another tsp. of the chocolate batter. Make sure that the chopped turtle is fully covered with the chocolate batter.

IMG_6469

Bake at 350F for 18-20 minutes. Halfway through, turn the muffin tin 180 degrees, to secure that the cupcakes are baked evenly. Transfer tins to wire racks and let cool for 10 minutes before turning cupcakes onto racks to cool completely.

 IMG_6474

Buttercream

Place sugar, salt and egg whites in a heatproof bowl over a pan of simmering water. Stir until the sugar has dissolved. Transfer to a mixing bowl and whisk at medium speed until the meringue has reached room temperature.

Cut the butter into small cubes and add a few cubes at a time to the meringue while whisking. Whisk until the buttercream is smooth and creamy – it takes 5-10 minutes.

Decorate the cupcakes with buttercream and top it of with a chocolate turtle, 2 raspberries and a spearmint leaf.

IMG_6475

Bon Appétit!

Ingredients (12 cupcakes)

Cupcakes

0.8 dl unsweetened cocoa powder

0.8 dl warm water

280 g cup sugar

2.5 dl flour

1 tsp. baking powder

1 tsp. salt

113 g butter

2 eggs, room temperature

1 tbsp. vanilla extract

2.5 dl sour cream

0.8 g dark quality chocolate (70%)

24 mini chocolate turtles (Toms)


Swiss Meringue Buttercream (24 servings)

225 g sugar

5 large egg whites

1/4 tsp. salt

1 tbsp. vanilla extract

450 g butter, room temperature (preferably organic)


Decoration

24 rasberries

12 spearmint leafs


Savoy and Zucchini Salad

Cabbage, cabbage, cabbage and more cabbage! Many people think that cabbage (of any kind) is boring and tasteless. Well, we believe that cabbage (of any kind) is great and tasted fabulous – especially in its raw form. And what’s even better is, that it saturates more than green salad.

So once again we have made a salad with cabbage as the main ingredient.

Remember, that whenever you use cabbage (or other vegetables grown near the soil) it is extremely important to rinse it thoroughly in water, as it often contains dirt. Not only does it taste bad, but it is also unhealthy for you.

Hope that you will enjoy the recipe 🙂


Ingredients (4 servings)

1/2 red onion

2 tbsp. blackcurrant vinegar

1/2 tbsp. olive oil

1/2 tsp. honey

1/4 tsp. sugar

Salt

Pepper

1/2 savoy cabbage

1 zucchini

1/2 cup almonds, roasted

2-3 tbsp. cilantro

1 cup sour cream

2 garlic cloves, minced

1/2 lemon, juice

Pepper


Mix together vinegar, oil, honey, sugar, salt and pepper and stir to combine. Chop the onion into small cubes and add to the dressing. Stir to make sure that all the onion cubes gets marinated. Let rest while preparing the rest of the salad.

Slice the cabbage thinly, rinse in cold water and set a side to let the water drip off. You can help the dripping process, using a colander. Cut the zucchini in half lengthways and remove the core. Slice thinly (use a mandolin iron if you have one).

Place sour cream, lemon juice and minced garlic in a bowl and stir to combine. Taste and season with pepper.

Mix cabbage, zucchini slices and dressing in a bowl and stir well to make sure that it is well combined. Let rest in the fridge for at least 30 minutes, preferably 1-2 hours.

Arrange on a plate just before serving and sprinkle the marinated onions on top, followed by the roasted almonds and cilantro.

Serve as a side dish for your favorite meat or as a lunch salad alone.

IMG_6414

Bon Appétit!

Ingredients (4 servings)

1/2 red onion

2 tbsp. blackcurrant vinegar

1/2 tbsp. olive oil

1/2 tsp. honey

1/4 tsp. sugar

Salt

Pepper

1/2 savoy cabbage

1 zucchini

1.25 dl almonds, roasted

2-3 tbsp. cilantro

2.5 dl sour cream

2 garlic cloves, minced

1/2 lemon, juice

Pepper


Oven Roasted Potatoes with a Twist of Summer

Potatoes are one of those basic ingredients in the kitchen that can be translated into a huge range of different things: roasted, cook, mashed, grilled etc.

Throughout the summer, we will make a range of our favorite  potato recipes beginning with these delicious oven roasted potatoes with onions marinated in blackcurrant vinegar and topped with feta cheese and basil.

If you have trouble finding blackcurrant vinegar anywhere, you can replace it with raspberry vinegar, but remember that the taste will be a bit different.


Ingredients (4 servings)

2 pound small potatoes

1 red onion, chopped

3 oz. feta cheese, crumbled

2 tbsp. basil leaves, chopped

3 tbsp. blackcurrant vinegar

1 tbsp. olive oil

1/2 tsp. sugar

1 tsp. honey

Salt

Pepper


Place vinegar, olive oil, sugar and honey in a small mixing bowl and stir to combine. Taste and season with salt and pepper. Add the chopped onion and stir a few times, so all the onion pieces touches the marinade. Set a side and let rest for at least 1 hour (preferably 2).

Clean the potatoes and cut them in half. Bake in the oven at 400F for 30-35 minutes or until just tender.

Place the roasted potatoes on a plate and sprinkle the marinated onions on top, followed by the crumbled feta cheese and chopped basil.

Serve on a hot summer day with good piece of meat and a glass of wine 🙂

IMG_6416

Bon Appétit!

Ingredients (4 servings)

450 g small potatoes

1 red onion, chopped

1 dl feta cheese, crumbled

2 tbsp. basil leaves, chopped

3 tbsp. blackcurrant vinegar

1 tbsp. olive oil

1/2 tsp. sugar

1 tsp. honey

Salt

Pepper