Mayonnaise – simple, easy, delicious and without additives!

Mayonnaise – who doesn’t use mayonnaise at least once in a while?
Well, we use many almost every day as a sandwich spread, in cold dressings or as a condiment for tapas dishes.

For years I bought my mayo, mostly because I didn’t realize how easy it was to make myself. Then one evening we were having friends over for dinner and to my horror I realized that I didn’t have any mayo for the salad dressing I had planned to make, and I didn’t have time to go the grocery store to buy some. So what to do?? Well, I looked in the fridge and all my cabinets for an alternative and what I found was egg yolks, mustard, vinegar and vegetable oil and there the case was set – I needed to make my first mayo and I was in a hurry! Of cause our guests turned up in the middle of my mayo-miracle and everyone stood there in the kitchen looking at me while I slowly but confidently poured oil into the egg mixture and created my first and very successful mayonnaise.

Ingredients (6 cups)

16 oz egg yolk or egg stir

4 tbsp Dijon mustard

4 tbsp red wine vinegar

48 fl oz vegetable oil

2-4 tsp salt

Mix together egg yolk/egg stir, mustard and vinegar in a medium-large bowl, using a stand mixer, hand mixer or a whisker if you feel like getting some overarm/shoulder exercise. Using my KitchenAid I have on speed 6 during the entire process. If you use a regular whisker, try to keep the same whisking speed all the time. If you get tired (which you will, making large portion like this) you can have a break or two, just remember not to leave any excess oil on top of the mayonnaise while you arm is recovering. Incorporate the oil and then take a break.

Mayonnaise 1

Keep on mixing while you slowly pour in the vegetable oil.
If you get too much oil into the mixture at one time the eggs cannot absorb the oil and you will ruin the mayonnaise. So it is better to take a few more minutes and get the exact right consistency instead of ruining the entire mayonnaise. As you pour in the oil and mix you see the mixture thicken and turn in to a lovely an light mayonnaise. Towards the end of the process you might find it difficult to incorporate the remaining oil. If you feel that the mayonnaise has the right consistency, stop pouring in anymore oil. If you want it a little bit thicker you can take finish off the process with a regular whisker, making sure that you get all the way around the edges of the bowl.
Add 1 tsp. of sat at a time until you have the wanted taste.

Mayonnaise 2

Transfer the mayonnaise to air tight jars (I use Mason jars) and store in the fridge for up to 4 weeks.
Use as a sandwich spread, as dipping for warm freshly baked bread, as a condiment for oven roasted salty potatoes or something fourth and totally different – mayonnaise is perfect for almost everything 🙂

FOOD ON DEMANT (1 of 1)

Bon Appétit friends!

Ingredients (6 cups)

450 g egg yolk or egg stir

4 tbsp Dijon mustard

4 tbsp red wine vinegar

1420 ml vegetable oil

2-4 tsp salt

Ginger and chili kick starter – without a juicer

Are you among those people that believe that you need a nice and expensive juicer to make your own juice? Well, I was once one of those people and as I knew I was moving from one end of the world to another I didn’t wanna go and spend the necessary amount of money on a juicer and was therefore not making any juices.
After a winter with a few colds, a sore throat and a bad craving for home made juice I decided to come up with an alternative. I went to my kitchen, looked in all my cabinets and quickly decided to try the blender, bowl, colander and kitchen towel method and you know what? It worked perfectly… and in that moment I realized that I had probably just saved about $200 (the average price for a good juicer in Denmark) – $200 that I could use on something else and still get a perfect juice whenever I wanted 🙂
Know that I have moved I still use this method as I find it a little stupid to spent money on something that I can do myself and get the same result. Of cause it takes a little longer (15 minutes) but I think it is worth it in the end and you will definitely fell more passionately about your juice when it is made this way 🙂

If you get hooked on the juice-without-a-juicer idea, you can check out my other my other juice recipes which includes carrot and clementine, clementine and orange, cranberry enegizer and the green vitamin bomb.

Ingredients (4 servings)

2 large or 4 medium apples

1 orange

0.5 lemon

1 chili

1 tbsp ginger root

0.5 cup water, cold

Rinse the apples in cold water, remove the core and chop into smaller pieces. Place in a regular blender together with the cold water. Blend for a few seconds to give space to remaining ingredients (this is not necessary if your blender is big enough to contain it all).
Peel the orange, lemon and ginger, cut it into smaller pieces and add it to the blended apples together with the chili. I have used a Tabasco chili, which gives it a little kick – not too much, not too little, but you can use any chili.
Blend it all well together. I use the ‘liquify’ button on my KitchenAid blender for about 30 seconds.

Ginger & chili juice 1

Find a bowl, a colander and a kitchen towel. It is important that it is a brand new kitchen towel that you only use for juicing and nothing else.
Place the colander in the bowl, cover it with the towel and pour approximately half of your juice batter into the towel.Ginger & chili juice 2

Use one hand to assemble the towel and the other hand to twist it around. Keep twisting to get all the juices out. Remove the all the dry fruit from the towel and repeat the process with the other half of the juice batter.
This portion makes about 3.5 cups (a lille less than 1 liter) and is enough for 4 servings.

Ginger & chili juice 3

Let the juice rest in the fridge for an hour or two if you want a strong ginger taste. Otherwise you can serve immediately in a glass with a few ice cubes.
If you have kids and plan on serving this juice for breakfast, you should consider leaving out the chili and only use half of the ginger.

Serve for breakfast, after a trip to the gym or use it as a natural remedy against a sore throat. This juice can be serves for anything at any time, so there is no excuse for not trying it 🙂

FOOD ON DEMANT (2 of 2)

Bon Appétit Friends!

Ingredients (4 servings)

2 large or 4 medium apples

1 orange

0.5 lemon

1 chili

1 tbsp ginger root

1.25 dl water, cold

Stuffed chicken breast with fresh brussels sprout salad

Hello there followers and other foodies out their 🙂

Before talking about this amazing chicken and salad I would like to say that I am sorry for my unstable blogging the last 8-9 month. As some of you may know my husband Chris and I relocated from Denmark to Atlanta, Georgia in early April to start a new life as entrepreneurs and it has taken a lot of our time and energy. Things rarely goes as planned and we have now turned to entrepreneurial adventure B which will leave me more time for cooking and blogging, which is what I really love spending my time on.
When plan B is ready to be know by the public, I will definitely drag all of you guys and girls into our adventure, so look forward to the next few month where a dream might come true.

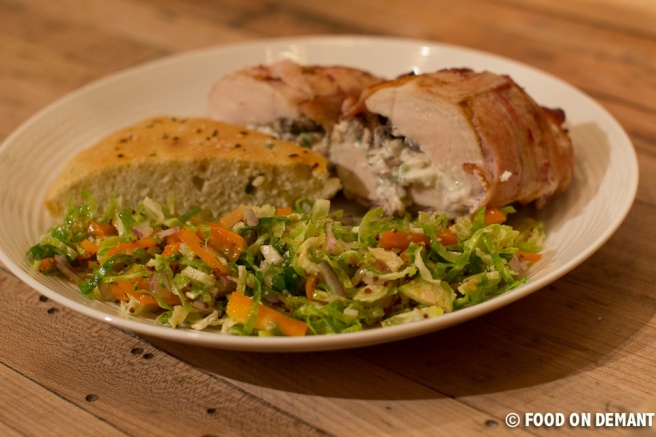
Enough about me and my entrepreneurial dream, this blog is about food and today I will show you how to make the most amazing stuffed chicken breast with a fresh and crispy brussels sprout salad. If you think that either you, your better half, children or guests don’t like brussels sprouts, don’t worry… this salad tastes nothing like the steamed brussels sprouts that everybody remember from their childhood. I would even say, that if you serve it to people not telling them what it is, they will love it and ask for the recipe.
Today I serve the salad together with cheese stuffed chicken, but otherwise I like to add a little bit of feta cheese to the salad to give it an extra punch.
Besides this brussels sprouts recipe I can also recommend my honey glazed recipe as well as my other raw brussels sprout salad.

Hope that you will enjoy and please leave a comment if you have any questions or just want to learn more 🙂

Ingredients (4 servings)

Brussels sprout salad

16 oz. brussels sprouts, cleaned

1 bell pepper

1 red onion

3 tbsp olive oil

1 tbsp honey

1.5 tbsp grainy mustard

1 lime, juice

Stuffed chicken breast

4 chicken breasts, organic

6 oz. cream cheese

0.5 red onion

1 chili pepper

1-2 garlic cloves

1 pinch of black pepper

8 oz mushrooms

8 oz bacon, sliced

2 tbsp butter

Salt & pepper

Begin with the chicken breasts. Preheat the oven at 400F/200C and cover a baking tray baking paper followed by a wire rack. Make sure that there is space between the baking tray and the wire rack, this will help the bacon get crisp all the way around.

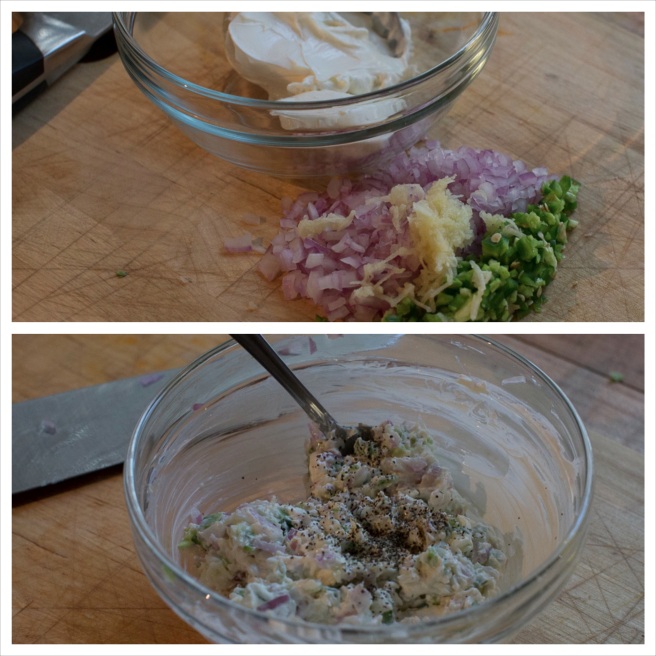
Chop onion, garlic and chili pepper (I used jalapeños, but if you like a more kick to your chicken choose something with more heat) finely and add it to a bowl with cream cheese and black pepper. Mix it all together and set aside while preparing the mushrooms and chicken breasts.

Stuffed chicken with brussels sprouts salad 2

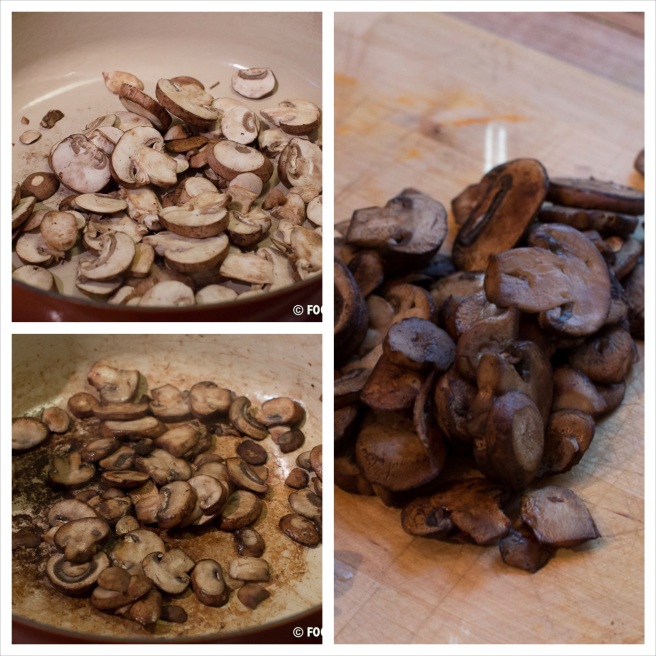
Clean and slice the mushrooms. Remember never to clean mushrooms by washing them as it will remove a lot of the flavor, use a brush or a little sharp knife instead.
Add the sliced mushrooms to a dry medium-hot pan and sauté until most, but not all of liquid has evaporated. If you add too many mushrooms to the pan at one time, you will risk that instead of the liquid evaporating it will just be released into the pan and boil the mushrooms instead of sautéing them, so if you plan on making a larger portion do you self a favor and divide this process in two.
Transfer the sautéed mushrooms to a chopping board and let cool before chopping them into small pieces.

Stuffed chicken with brussels sprouts salad 3

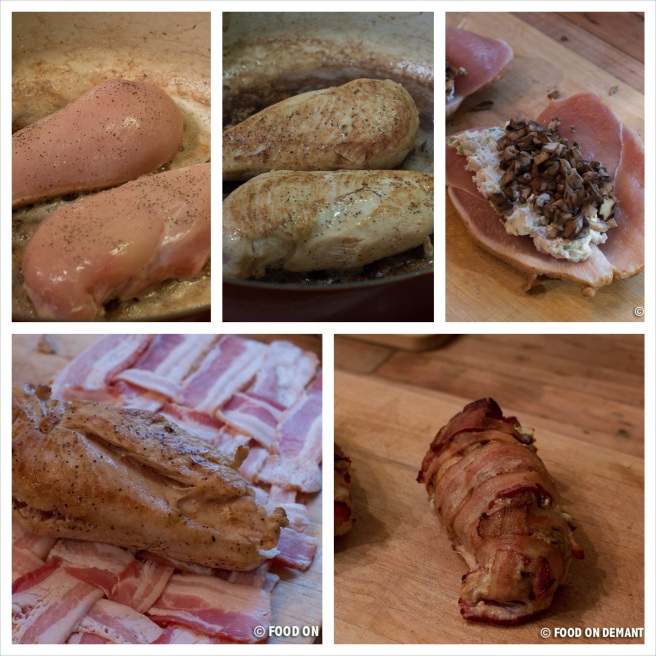
Season the chicken breasts with salt and pepper. Without cleaning the pan add the butter and let melt at medium heat. Add the seasoned chicken breasts and roast on all sides until light brown, about 2-3 minutes on each side.
Remove the roasted chicken from the pan and make a deep slice into the side of the meat. Stuff the chicken with with your cheese filling and chopped mushrooms and wrap it in bacon.  On the picture below I have used an overload of bacon, but this not necessary. The most important thing is that the stuffing stays inside the chicken and not wether you have used 4 or 8 slices of bacon and how your wrap looks like. Of cause a nice looking wrap will make a better finished impression, but if the bacon gets layered it will be difficult getting it crisp.
Place the wrapped chicken breasts on the prepared baking tray/wire and bake in the oven until the internal temperature reaches 165F/74C which for me takes approximately 35-40 minutes.

Stuffed chicken with brussels sprouts salad 4

While the chicken is baking you have time to prepare the salad.
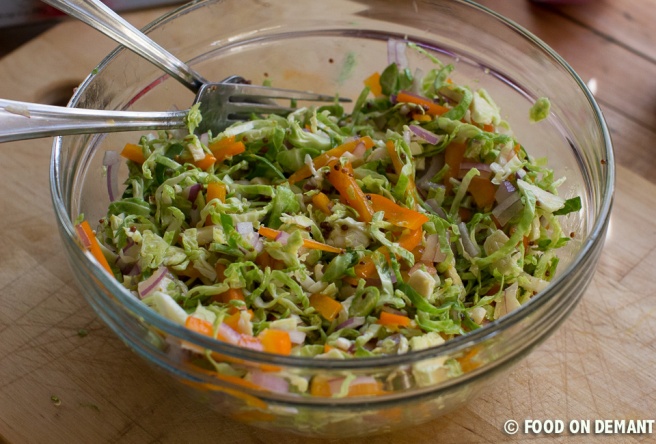
Cut the brussels sprouts in half and slice them. Clean and slice the pepper bell and red onion too. Add all three to a mixing bowl and use your fingers or two forks to combine it.
In another bowl, mix together olive oil, honey, mustard and lime juice. Mix well to make sure that the honey gets incorporated into the dressing and not left in the bottom of the bowl.
Pour the well mixed dressing over the salad and mix. Leave to rest until the chicken is finished. Stuffed chicken with brussels sprouts salad 1

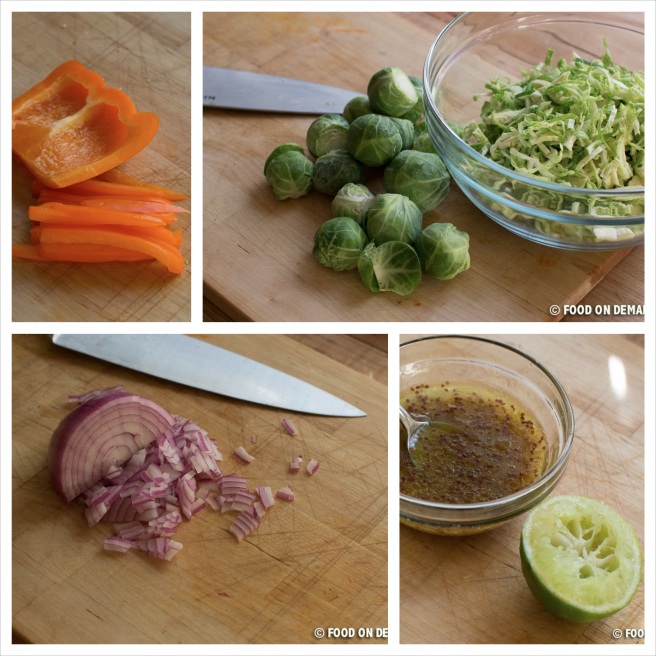
The salad can also be made in advance if you are entertaining guests or your kids while cooking. Just have in mind that if you want the salad to be fresh and crispy, you will have wait and not add the dressing until last minute. If you on the other hand would like the dressing to get well mixed into the salad you can add it early and let in rest until dinner time. I like it either way so for me it depends on the time.

Stuffed chicken with brussels sprouts salad (8 of 23)

Remove the chicken from the oven when it has reached the wanted temperature and let it rest for a few minutes before slicing it. Arrange on a plate together with the salad and a piece of warm home baked foccacia bread.

Serve with a light beer or a cold glass of white- or rosé wine.

Stuffed chicken with brussels sprouts salad (22 of 23)

Bon Appétit friends!

Ingredients (4 servings)

Brussels sprout salad

450 g brussels sprounts, cleaned

1 bell pepper

1 red onion

3 tbsp olive oil

1 tbsp honey

1.5 tbsp grainy mustard

1 lime, juice

Stuffed chicken breast

4 chicken breasts, organic

125 g cream cheese

0.5 red onion

1 chili pepper

1-2 garlic cloves

1 pinch of black pepper

225 g mushrooms

225 g bacon, sliced

2 tbsp butter

Salt & pepper