Pulled Pork and Slaw Burrito

What have you gotten for dinner tonight? We decided to make home made corn tortillas and fill them with our favorites – pulled pork and slaw 😀

Instead of writing a lot about how great it is, you should just try it and let us know what you think!


Ingredients (4 servings)

16 small corn tortillas

1 pound pulled pork

1/2 cup BBQ sauce

1/2 cup jalapeños hot sauce

1 portion summer slaw

2 limes, sliced


Place the pulled pork on a pan together with BBQ sauce and jalapeños hot sauce. Warm up at medium heat and let cook until the meat gets caramelized (this happens as there are quite a lot of sugar in the BBQ sauce).

IMG_0046 IMG_0049

Heat the tortillas for a few seconds until they get soft. Place 1/4 cup caramelized pulled pork on the warm soft tortilla, followed by summer slaw.

Place in a rectangular round bottom dish and serve with lime slices 🙂

IMG_0053Bon Appétit!

Ingredients (4 servings)

16 small corn tortillas

450 pulled pork

1.25 dl BBQ sauce

1.25 dl jalapeños hot sauce

1 portion summer slaw

2 limes, sliced


Summer Slaw

Once again we have made a slaw experiment 🙂 This time wanted to make a summer version and decided to replace the apple cider vinegar with lemon juice and then add sesame seeds and cilantro. It turned out to perfect when combined with pulled pork in a home made corn tortilla. If you’re not a fan of cilantro (either you hate it or love it), you can use basil instead 🙂


Ingredients (4 servings)

1/4 cabbage

1 red onion

1/2 lemon, zest and juice

1/4 cup confectioners sugar

1 tsp. mayo

1 cup sour cream

1 tsp. white sesame seeds

1 tsp. black sesame seeds

1/8 cup cilantro, chopped


Place lemon juice, confectioners sugar, mayo and sour cream in a mixing bowl and stir to combine. Set aside while slicing the cabbage and onion.

Slice both cabbage and onion finely and combine with lemon zest, chopped cilantro and both white and black sesame seeds. Pour the dressing over cabbage mix and combine well. Fridge for at least 30 minutes before serving.

IMG_0055

Bon Appétit!

Ingredients (4 servings)

1/4 cabbage

1 red onion

1/2 lemon, zest and juice

0.8 dl confectioners sugar

1 tsp. mayo

2.5 dl sour cream

1 tsp. white sesame seeds

1 tsp. black sesame seeds

3. tbsp. cilantro, chopped


Corn Tortillas

How often do you eat burritos/tortillas. Well, we eat them quite often as we find them perfect when ever we have leftovers. We have always just bought wheat tortillas from our local supermarket, but one day decided that we would try to make them ourselves.

To make original corn tortillas one need to get a flour type called masa harina (flour made from corn), which in Denmark, is easier said than done! It can only be bought in Chilihouse.dk, approximately 2 hours travel from where we live. Of cause we can buy it on their online shop, but postage costs more the the flour itself, so we decided to wait for a while. But to our luck a friend of ours visited the shop and bought a pound of flour, so that we could begin our tortilla experiment 🙂

As you can see in the recipe below, we chose to use chicken stock, but you can also just use hot water or if you want to spice it up a bit, you can use beer.

As with all other baking it takes time (approximately one hour), but we promise that it is all worth it 🙂


Ingredients (16 small tortillas)

2 cups masa harina (corn flour)

1 1/3 cup chicken stock, hot

IMG_0040

Combine flour with hot chicken stock to form a dough. Leave covered for 15 minutes. The texture should be soft clay but not sticky. Knead in more water if necessary.

Divide dough into 12 equally sized balls. Roll out dough balls between two sheets of baking paper until thin. If you would like your tortillas to be perfectly round, you can use a cake cutter (the one used here is 5.5 inches).

Heat a dry pan until hot. Place one tortilla in the pan and cook for 20-30 seconds on each side. Remove from the pan when the tortilla puffs up. Keep covered while baking the rest.

Fill with your favorite burrito stuffing and serve with a cold Mexican beer 😀

IMG_0044

Bon Appétit!

Ingredients (16 small tortillas)

500 g masa harina (corn flour)

3.5 dl chicken stock, hot


Chili Cheese Snacks

There is absolutely nothing better than homemade chili cheese snacks! We make them so often that Chris has made some tools especially for chili cheese (you can see the on the pictures below).

The chili cheese idea came after a sunday trip to McDonalds a few years ago, where we bought chili cheese tops. They tasted great but there were a few problems linked to the concept: 1) we don’t really know what they are made from, 2) they were cold before we were home and ready to eat, 3) they are quite greasy, and last but not least 4) they are way too expensive!

For those four reasons, we decided to make our own version with different kinds of cheese filling. They are one the most popular snacks (together with beef jerky and fried green tomatoes) when we invite friends and family over for a great BBQ Party.

We have tried several different cheese variation and most of them are fabulous (try and use blue cheese instead of cheddar cheese – especially if you are serving spicy chicken wings :-)). Feta cheese, gruyere or cream cheese with herbs are great alternatives too, so just choose your favorite cheese.

We hope that you will enjoy them as much as we do 🙂


Ingredients (20 snacks)

20 jalapeños

1/2 pound cream cheese

1/2 cup mild cheddar cheese, shredded

1/2 cup aged cheddar cheese, shredded

10 bacon slices

Pepper


Begin your chili cheese adventure by removing the seeds and stems from all the jalapeños. We use a homemade tool like shown on the picture below, but you can just use a small knife. Make sure that all the seeds are gone, so they don’t get to hot 🙂

 IMG_6422

IMG_6423

Place cream cheese and whisk until it gets a bit more fluffy and then add the shredded cheddar cheese. stir until evenly combined. Taste and season with grounded pepper if necessary. Place the cheese mix in a piping back and fill it into all the cleaned chilies.

IMG_6526

Cut the bacon slices into halves and wrap them around the cheese filled chilies. Make a rack out of tin foil, so the chilies don’t fall over and all the cheese disappears down into the smoker/grill – that would really be a shame! One again, the tool you can see on the picture is homemade, and says a lot about us – we make MANY chili cheese snacks 😀

Place the rack with the stuffed and wrapped chilies in your smoker/grill and put the lid on. Smoke/grill at about 230F for about an hour or until the bacon gets crisp.

Serve as appetizers at your next garden party or just as a good weekend snack with an ice-cold beer – but be fast, they’ll be gone before you know it – which is why we don’t have picture of the finished ones (yet) 😀

IMG_6531

Bon Appétit!

Ingredients (20 snacks)

20 jalapeños

450 g cream cheese

1.25 dl mild cheddar cheese, shredded

1.25 dl aged cheddar cheese, shredded

10 bacon slices

Pepper


30 Minute Duck Salad

Last night we were both feeling tired and decided that dinner was going to be something fast and and easy but still delicious. We look in the fridge and found ingredients for out favorite duck salad and decided to make it.

One of the great things about this sale is, that it takes less than 30 minutes to make and it tastes fabulous 🙂 The combination of the juicy duck meat together with all the crispy vegetables and the sweet mango and perfumed cilantro gives it a bit of an Asian twist without it being to much.

The recipe below is for a 2-persons main course, but you can use it as an appetizer to, which will cover 4-6 servings instead.


Ingredients (2 servings)

1 duck breast

Salt

Pepper

2 handfuls rucola salad

1/2 leek

6 cherry tomatoes

10 asparagus

1/2 cucumber

1/2 mango

1 onion

1/2 cup soy sauce

1/4 cup cilantro


Clean the duck breast and remove tendons and blood vessels if any. Heat up a frying pan and make small cuts in the duck skin; season with salt and pepper. Place the duck breast with the skin side down, when the pan is smoking hot. Turn down the heat and fry on the skin side for 8-10 minutes. Turn the duck breast and turn off the heat. Let fry for additionally 2-3 minutes before removing the it from the pan. Let rest (on the meat side) on a plate for 10 minutes before cutting it into 1/2 inch slices.

While the duck is frying and resting, you have time to prep the vegetables. Clean the rucola salad and leek in cold water and let it drip off in a colander.

Slice the onion in paper thin slices and place them in a bowl and cover with soy sauce. Set aside until the rest of the vegetables are prepared.

Clean the asparagus and cut them into bit size pieces and blanch in boiling water for 30 seconds. Rinse the asparagus in cold water to avoid that they get soft.

Slice the tomatoes, mango, cucumber and the cleaned leek into thin slices.

Arrange the salad on a nice plate beginning with the rucola salad, followed by the cucumber-, tomato-, and leek slices. Then add the blanched asparagus and the soy-marinated onion slices and finish off with the mango slices.

When the duck breast has been resting for approximately 10 minutes, you can slice it. Place the slices on top of the salad and sprinkle with cilantro.

Serve with a good cold beer 🙂

IMG_6642

Bon Appétit!

Ingredients (2 servings)

1 duck breast

Salt

Pepper

2 handfuls rucola salad

1/2 leek

6 cherry tomatoes

10 asparagus

1/2 cucumber

1/2 mango

1 onion

1.25 dl soy sauce

0.8 dl cup cilantro


World Class Chocolate Cupcakes with berries

This past saturday I was invited to s bachelorette party but was prevented due to other activities that day. It was asked if anyone could bring a cake for the afternoon coffee and even though I has other plans for that day, I volunteered. I decided to make these cupcakes filled with Amedei Toscano White and raspberries, as I find it to be the perfect summer cupcake and we truly need to see some summer here in Scandinavia soon!!

The bride to bee, was very happy with the cakes and so was my mother who got a few too (and she doesn’t even like white chocolate and strawberries), so it will definitely not be the last time I make them 🙂


Ingredients (14 cupcakes)

Cupcakes

1 stick butter, room temperature

1 cup + 1 tbsp. granulated sugar

3 eggs, room temperature

1 tsp. vanilla extract

2 cups of flour

11/2 tsp. baking powder

1/4 tsp. salt

1/4 cup buttermilk

1 lemon, zest

1/2 cup white quality chocolate, chopped

1 cup raspberries, frozen


Frosting

1 pound cream cheese, room temperature

1/5 cup confectioners sugar

1 tsp. vanilla extract


Decoration

14 strawberries

28 raspberries, fresh

28 blueberries, fresh


Place butter and sugar in a mixing bowl and whisk until light and fluffy. scrape the sides of the bowl if necessary. Add the eggs one at time and whisk until incorporated. then add the vanilla extract.

combined flour, baking powder and salt in another mixing bowl. Add the flour mixture to the butter and eggs mixture alternating with the buttermilk. Scrape the sides of the bowl again, if necessary.

Add the lemon zest and the chopped white chocolate, and fold until evenly combined. When I want you to fold and not whisk, it is to make sure that the batter keeps the fluffy consistency it got in the last step. If you over-whisk, you’ll risk to loos the fluffiness and the cupcakes will get heavy.

Line standard muffins tins with paper liners. Fill each paper line with 1 tsp. of the batter. divide the frozen raspberries in the middle of the batter. Then divide the remaining batter on top of the raspberries and bake at 400F for approximately 18 minutes or until a toothpick comes out clean.

IMG_6637

Frosting

Place all three ingredients in a mixing bowl and whisk until smooth and fluffy. Put the frosting in a piping bag with your favorite piping tip (this one is Wilton M1) and decorate the cakes.

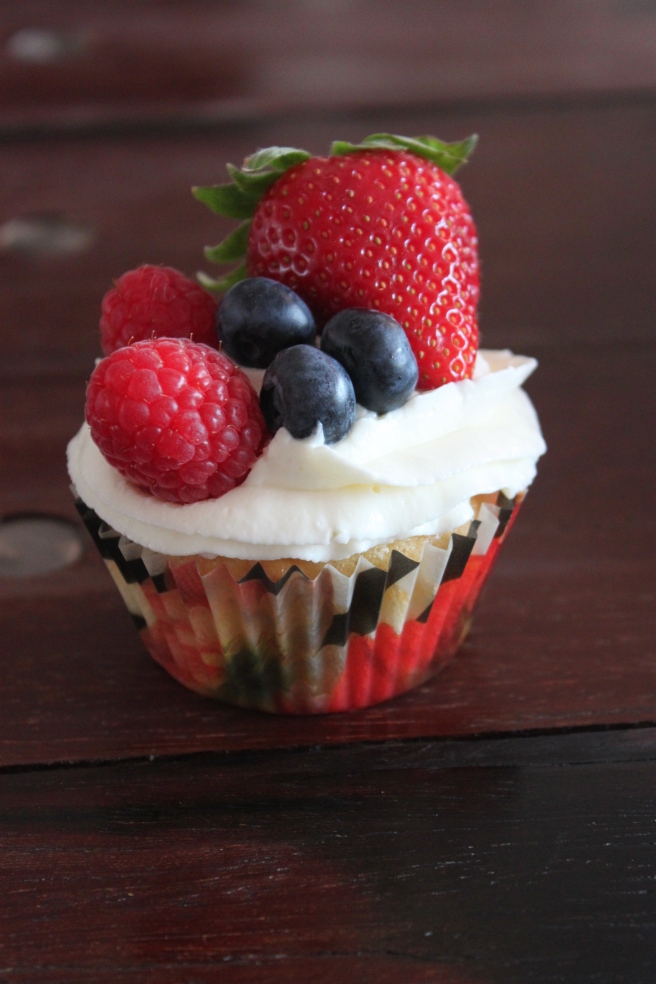
To finish of the cakes, decorate with one strawberry and two raspberries and blueberries. Serve in the afternoon with a great cup of coffee or as a dessert with a glass of sparkling wine.

IMG_6635

Bon Appétit!

Ingredients (14 cupcakes)

Cupcakes

113 g butter, room temperature

225 g granulated sugar

3 eggs, room temperature

1 tsp. vanilla extract

500 g flour

1 1/2 tsp. baking powder

1/4 tsp. salt

0.5 dl buttermilk

1 lemon, zest

80 g white quality chocolate, chopped

20 raspberries, frozen


Frosting

450 g cream cheese, room temperature

25 g confectioners sugar

1 tsp. vanilla extract


Decoration

14 strawberries

28 raspberries, fresh

28 blueberries, fresh


Biscuits with a Bite

This id our third post on biscuits and we can assure you that it won’t be the last 😀 The basic recipe is a Southern biscuit to which we all all kind of ingredients like e.g. cheddar, rosemary, thyme or as this time jalapeños.

These were made because we had forgotten to by a baguettes for last nights dinner and we wanted to use the remaining jalapeños we had in our pantry. They turned out to be really good and the chili flavor from the jalapeños makes it a bit spicy but not hot. If you are a afraid that the biscuits gets to hot, you can remove the seeds from one of the jalapeños, when you make them the first time (cause we know that you will make them again)! Hope that you will like them as much as we do 🙂

Enjoy!


Ingredients (12 biscuits)

2 1/2 cups + 2 tbsp. flour

2 1/2 tsp. baking powder

1/2 tsp. salt

1 tbsp. granulated sugar

1/2 cup cold butter, cut into small pieces

3/4 cup milk

3 large eggs

2 jalapeños, chopped

In a large mixing bowl, sift together flour, baking powder, salt and sugar. Cut the butter into the dry ingredients and whisk until the mixture resembles coarse crumbs. Add the chopped jalapeños and whisk again.

Beat 2 of the eggs slightly and add to the mixture together with milk. Knead until just combined and it has a sticky and moist texture.

Place the dough on a slightly floured surface. Knead until smooth.

IMG_6621

Roll out the dough to about 1/2 inch thickness. Fold the dough halfway over and roll again. Do this 4-5 times. Be careful not to roll all the air out of the dough. Cut the biscuits with a 2 1/2 inch cookie cutter.

IMG_6626

IMG_6628

Place the biscuits close together on a piece of baking paper. Beat the last egg slightly and brush the top of the biscuits.

Bake at 400F for about 18-20 minutes or until the tops are golden brown and a toothpick comes out clean.

Let cool for a few minutes before serving. These were served with baby back ribs and a leek and tomato salad, but you can serve them with all sorts of meat or salads :-)

IMG_6630Bon Appétit!

Ingredients (12 biscuits)

312 g flour

2 1/2 tsp. baking powder

1/2 tsp. salt

1 tbsp. granulated sugar

113 cold butter, cut into small pieces

1.8 dl milk

3 large eggs

2 jalapeños, chopped


Cheddar Biscuits

Biscuits, biscuits and more biscuits…. We both love biscuits and we make then quite often. Sometimes because they are the best choice for the food served and other times, because we have forgotten to by/bake some bread and don’t have the time to wait for the dough to  raise.

You can add all kind of things to your biscuits. Leaving out the cheddar cheese from this recipe, and you will get some plain and simple (but incredible delicious) Southern biscuits or you can add chilies, thyme or something else of your choice. In time we will make a whole range of different biscuits with the same basic recipe, and you are welcome to come with suggestions 🙂


Ingredients (12 biscuits)

2 1/2 cups + 2 tbsp. flour

2 1/2 tsp. baking powder

1/2 tsp. salt

1 tbsp. granulated sugar

1/2 cup cold butter, cut into small pieces

3/4 cup milk

3 large eggs

1/2 cup mild cheddar cheese, shredded

1/2 cup aged cheddar cheese, shredded

In a large mixing bowl, sift together flour, baking powder, salt and sugar. Cut the butter into the dry ingredients and whisk until the mixture resembles coarse crumbs. Add shredded cheddar and whisk again.

Beat 2 of the eggs slightly and add to the mixture together with milk. Knead until just combined and it has a sticky and moist texture.

Place the dough on a slightly floured surface. Knead until smooth.

Roll out the dough to about 1/2 inch thickness. Fold the dough halfway over and roll again. Do this 4-5 times. Be careful not to roll all the air out of the dough. Cut the biscuits with a 2 1/2 inch cookie cutter.

Place the biscuits close together on a piece of baking paper. Beat the last egg slightly and brush the top of the biscuits.

Bake at 400F for about 18-20 minutes or until the tops are golden brown and a toothpick comes out clean.

Let cool for a few minutes before serving. These were served with baby back ribs and wasabi coleslaw, but you can serve them with all sorts of meat or even as a breakfast bun 🙂

IMG_6573

Bon Appétit!

Ingredients (12 biscuits)

312 g flour

2 1/2 tsp. baking powder

1/2 tsp. salt

1 tbsp. granulated sugar

113 g cold butter, cut into small pieces

1.8 dl milk

3 large eggs

1.25 dl mild cheddar cheese, shredded

1.25 dl aged cheddar cheese, shredded


Jalapeños Hot Sauce

A few days ago we made a bucket full of chili cheese top (recipe comes later this week) and we thought that it was a pity to through away the inside of the jalapeños. Thus we decided to try and make a jalapeños hot sauce, and the end result was so good that we decided that we would share it with all of you guys 🙂

The recipe is quite easy to follow and it doesn’t take long to make. So do you have jalapeños leftovers after dinner, you can freeze them and when you have enough, you can make delicious homemade hot sauce to be served on top of tacos or to spice up your daily cooking. Have you used a properly cleaned jar, the hot sauce can be stored for up to 6 month in a cool and dark place (ours doesn’t last for more than a few weeks, as we looooove hot sauce :-D).


Ingredients (about 3 cups)

50 jalapeños

6-7 garlic cloves

1 large onion

1 tbsp. salt

3 cups water

1 cup apple cider vinegar


Remove the stem form the jalapeños and slice them (as described above, and as you can see the first picture, we have used all the leftovers from our chili cheese tops so we have only added 4 whole jalapeños).

Chop the onion and garlic roughly and place in a sauce pan together with salt, jalapeños and water. Bring to a boil and cook at medium heat for 20 – 30 minutes or until most of the water has evaporated. Stir occasionally to avoid burning.

IMG_6585

IMG_6587

Remove the cooked jalapeños mix from the heat and let it cool a bit before transferring it to a blender. Use a rubber spatula to get all the chili mix from the sauce pan and into the blender. Blend on medium speed while slowly adding the vinegar. Scrape the sides of the blender if necessary. Blend for 2-3 minutes.

Pour the chili sauce back into the sauce pan and bring to a boil again and cook for approximately 10 minutes or until the sharpness of the vinegar is gone.

Depending on your consistency preference you have two options now: 1) you can leave it as it is now and transfer it to a clean jar, or 2) you can transfer the chili sauce through a stainer and into a cleaned jar. This is done to remove any small seeds that did not get blended completely. The difference between the two methods, is the consistency of the end result. Using the last method you will get a very thin hot sauce like e.g. Tabasco, while the first methods gives a thicker and more grainy consistency.

We have chosen the second method as we like it thin, but if you prefer it slightly thicker you can just do that 😀

IMG_6589

Bon Appétit!

Ingredients (about 7.5 dl)

50 jalapeños

6-7 garlic cloves

1 large onion

1 tbsp. salt

7.5 dl water

2.5 dl apple cider vinegar


Guess what it is… GIVE-AWAY!

The first give-away from Food on Demant is going to be a ‘guess what this is’ give-away 😀

During the years we have developed a number of kitchen tools to help ease the cooking. Below you can see two pictures of tools which we recently developed. As you’ll have to guess what the tools are for, we can “unfortunately” not reveal anything about the purpose of these two tools, but we look forward to hear what you think it is for 😀

To participate in the give-away, you’ll have to leave a comment with what you think the tools are for. The give-away will run until sunday (May 19th) where there will be a random draw between all comments 🙂

Image

Image

As we have readers/followers from all over the world, the give-away will have to be something that can be send by post. Therefore we have decided that the give-away is going to be 4 plates of Amedei Chocolate. Chocolate from Amedei is not just chocolate – it is definitely the world’s best chocolate 🙂 We could tell about the delicious taste, its creaminess, aroma etc., but the best way to get to know it, is to taste it – so leave a comment and participate in the competition 😀

amedei-cover

Feel free to spread the word to your friends and other bloggers, so they will get the change to taste this fabulous chocolate too 🙂 We hope to get a lot of comments and we look forward to spreading the taste of quality chocolate to one of you 🙂

Chris & Ann 🙂


THE GIVE AWAY IS NOW OVER AND WE ARE READY TO REVEAL WHAT THE TOOLS ARE FOR 🙂

First of all, we want to thank you for your contribution in the contest. You have come with some quite interesting suggestions for the use of the two tools and a few of you have got it right 😀

As you can see o the pictures below, the large round tool is a Chili Cheese Rack while the small long tool is used for getting the stem and seeds out of the chilies!

IMG_6526 IMG_6422

IMG_6423

As promised we made a random draw between all comments, and the winner is comment no. 6, so congratulation to Susanne 😀 Would you please send and e-mail to foodondemant@gmail.com with your address and your chocolate preferences?

Once again, thank you for participating in our give away 🙂