Juicy Pork Chops with Sweet and Sour Peppers

Once again we forgot al about time and suddenly it was dinnertime. We are not that good at eating at the same time every night, and most often we use several hours in the kitchen, experimenting and having fun cooking.

Today has been nothing like that. Chris has been working late followed by an hour or two on his other hobby (designing and producing furnitures in metal and old wood), while I (Ann) has been in bed due to neck pains from an old whiplash.

As we had forgotten al about time, we decided to make something easy and quick but still delicious. It took less than 25 minutes (including prepping) and tasted fabulous 🙂


Ingredients (4 servings)

Pork chops

4 pork chops

4 cloves garlic, roughly chopped

1 handful thyme stems

1 tbsp. butter

Salt

Pepper


Sweet & Sour Peppers

1 tbsp. olive olie

2 red peppers

2 yellow peppers

2 red onions

1 jalapeños

1 cup edamamme beans

1 lime, juice and zest

2 tbsp. sugar

1/2 cup red wine vinegar

Salt

Pepper


Begin with prepping the vegetables. Remove the seeds from the peppers and cut them lengthwise. Then cut the onions and the jalapeño into thin slices. We are both chili lovers so we rarely remove the seeds and stems from the chilies, but if you like it more mild, you can remove it (or leave out the jalapeño).

Add olive olie to a frying pan and heat. Then add the peppers, onions, jalapeños and edamamme beans and sauté for 2-3 minutes. Add sugar and sir to combine. When the peppers get a glazed surface add the red wine vinegar and juice and zest from the lemon. Season with salt and pepper. Turn down the heat and let simmer for about 10 minutes or until all the fluid had thickened.

While the sweet and sour peppers are simmering you can make the pork chops. Season the pork chops with salt and pepper. Heat a frying pan and add butter, garlic and thyme. When the butter begins get brown and smell like nuts, add the pork chops and fry for about 4 minutes before turning it. Fry 4 minutes on the other side too, while pouring some of butter over the top. This will give the meat a love nutty taste on the surface and prevent it from drying out in the frying process.

Arrange the sweet and sour pepper mix on a plate and top with a delicious and juicy pork chop and serve with bread or rice.

Image


Bon Appétit Friends!


Ingredients (4 servings)

Pork chops

4 pork chops

4 cloves garlic, roughly chopped

1 handful thyme stems

1 tbsp. butter

Salt

Pepper


Sweet & Sour Peppers

1 tbsp. olive olie

2 red peppers

2 yellow peppers

2 red onions

1 jalapeños

1 cup edamamme beans

1 lime, juice and zest

2 tbsp. sugar

1.25 dl red wine vinegar

Salt

Pepper


Advertisement

Creamy Shrimp and Spinach Spaghetti

This is one of my absolute favorite spaghetti dishes that I make as often as Chris will allow it 😉 It is both quick and easy and then it tastes delicious – what more can one demand after a long day?

Actually I think that we had an extremely long day when I made this sunday evening… We spent last week driving from Atlanta to Austin Texas and back again – 15 hours each way! Well, we didn’t take it all on day but drove from Atlanta to New Orleans to celebrate Chris birthday and our 2nd wedding day, then drove to San Antonio to visit a friend followed by Austin. 45 minutes north east of Austin is a charming little town named Taylor. Taylor is one of those small towns that lost the Wallmart battle and many shops are closed and buildings abandoned. We drove all the way there from Atlanta to eat brisket at Louie Mueller BBQ and oh man, we were not led down. The place was as authentic as one can imagine when thinking of Texas BBQ and meat was prepared by a handful of artists. Actually they have all attended culinary school, but the beauty about this place is, that everything is made from the intuition of the cooks – there is not a single thermometer in the restaurant and the electric oven is only turned on to bake peach cobblers!
So if are ever in or around Austin, I can highly recommend this place for an authentic Texas BBQ experience 🙂 However, I must warn you a little bit… Don’t go there if you have hygiene issues. When I say it is authentic, I mean really authentic – there are no air conditioning and don’t be surprised if you find a cockroach or two in the dining room. But again, it is the best BBQ I have ever had, and I am definitely going there again some time.

Well to get back to this delicious spaghetti dish, we had a long drive home and non of really wanted to cook so we decided on something easy and quick. If you buy pre-washed spinach this dish does not take more than 15-20 minutes to make and it tastes wonderful. If you want it to be even quicker, you can buy shrimps that is already cleaned and ready to cook.

Hope that you like it and feel free to leave a comment with your thoughts and or suggestions 🙂


Ingredients (4 servings)

1 tbsp. butter

3 large banana shallots

1 red chili

2 garlic cloves

1 tbsp. fresh thyme

14 oz. spinach

1 lemon, zest

1/3 cup cream

1/4 cup parmesan cheese, shredded + more for serving

17 oz. spaghetti

20 wild caught tiger shrimps

Salt & pepper


First step is to prepare the spaghetti as recommended on the package label. I will, however, recommend that you cooked it a little less than described, as it will cook a little bit more when it gets into the spinach mixture. Pour into a colander when cooked.

Next step is to clean the shrimps from sand and intestines. The easiest way to do that, is to cut it open in the back with a scissor, removing the shell and rinsing it in ice cold water. Place the clean shrimps on some paper towel on a plate in the fridge.

Begin by washing the spinach very carefully and let it dry on paper towel or something similar while preparing the other ingredients. If possible, I will highly recommend that you buy pre-washed spinach as it is much easier and faster to work with and I honestly think that it is worth the extra dollar.
Then slice the shallots and chili and grate the garlic cloves. Remove the stem and seeds from the chili if you prefer a very mild chili taste or leave it in, if you are like me – a true chili fan 🙂

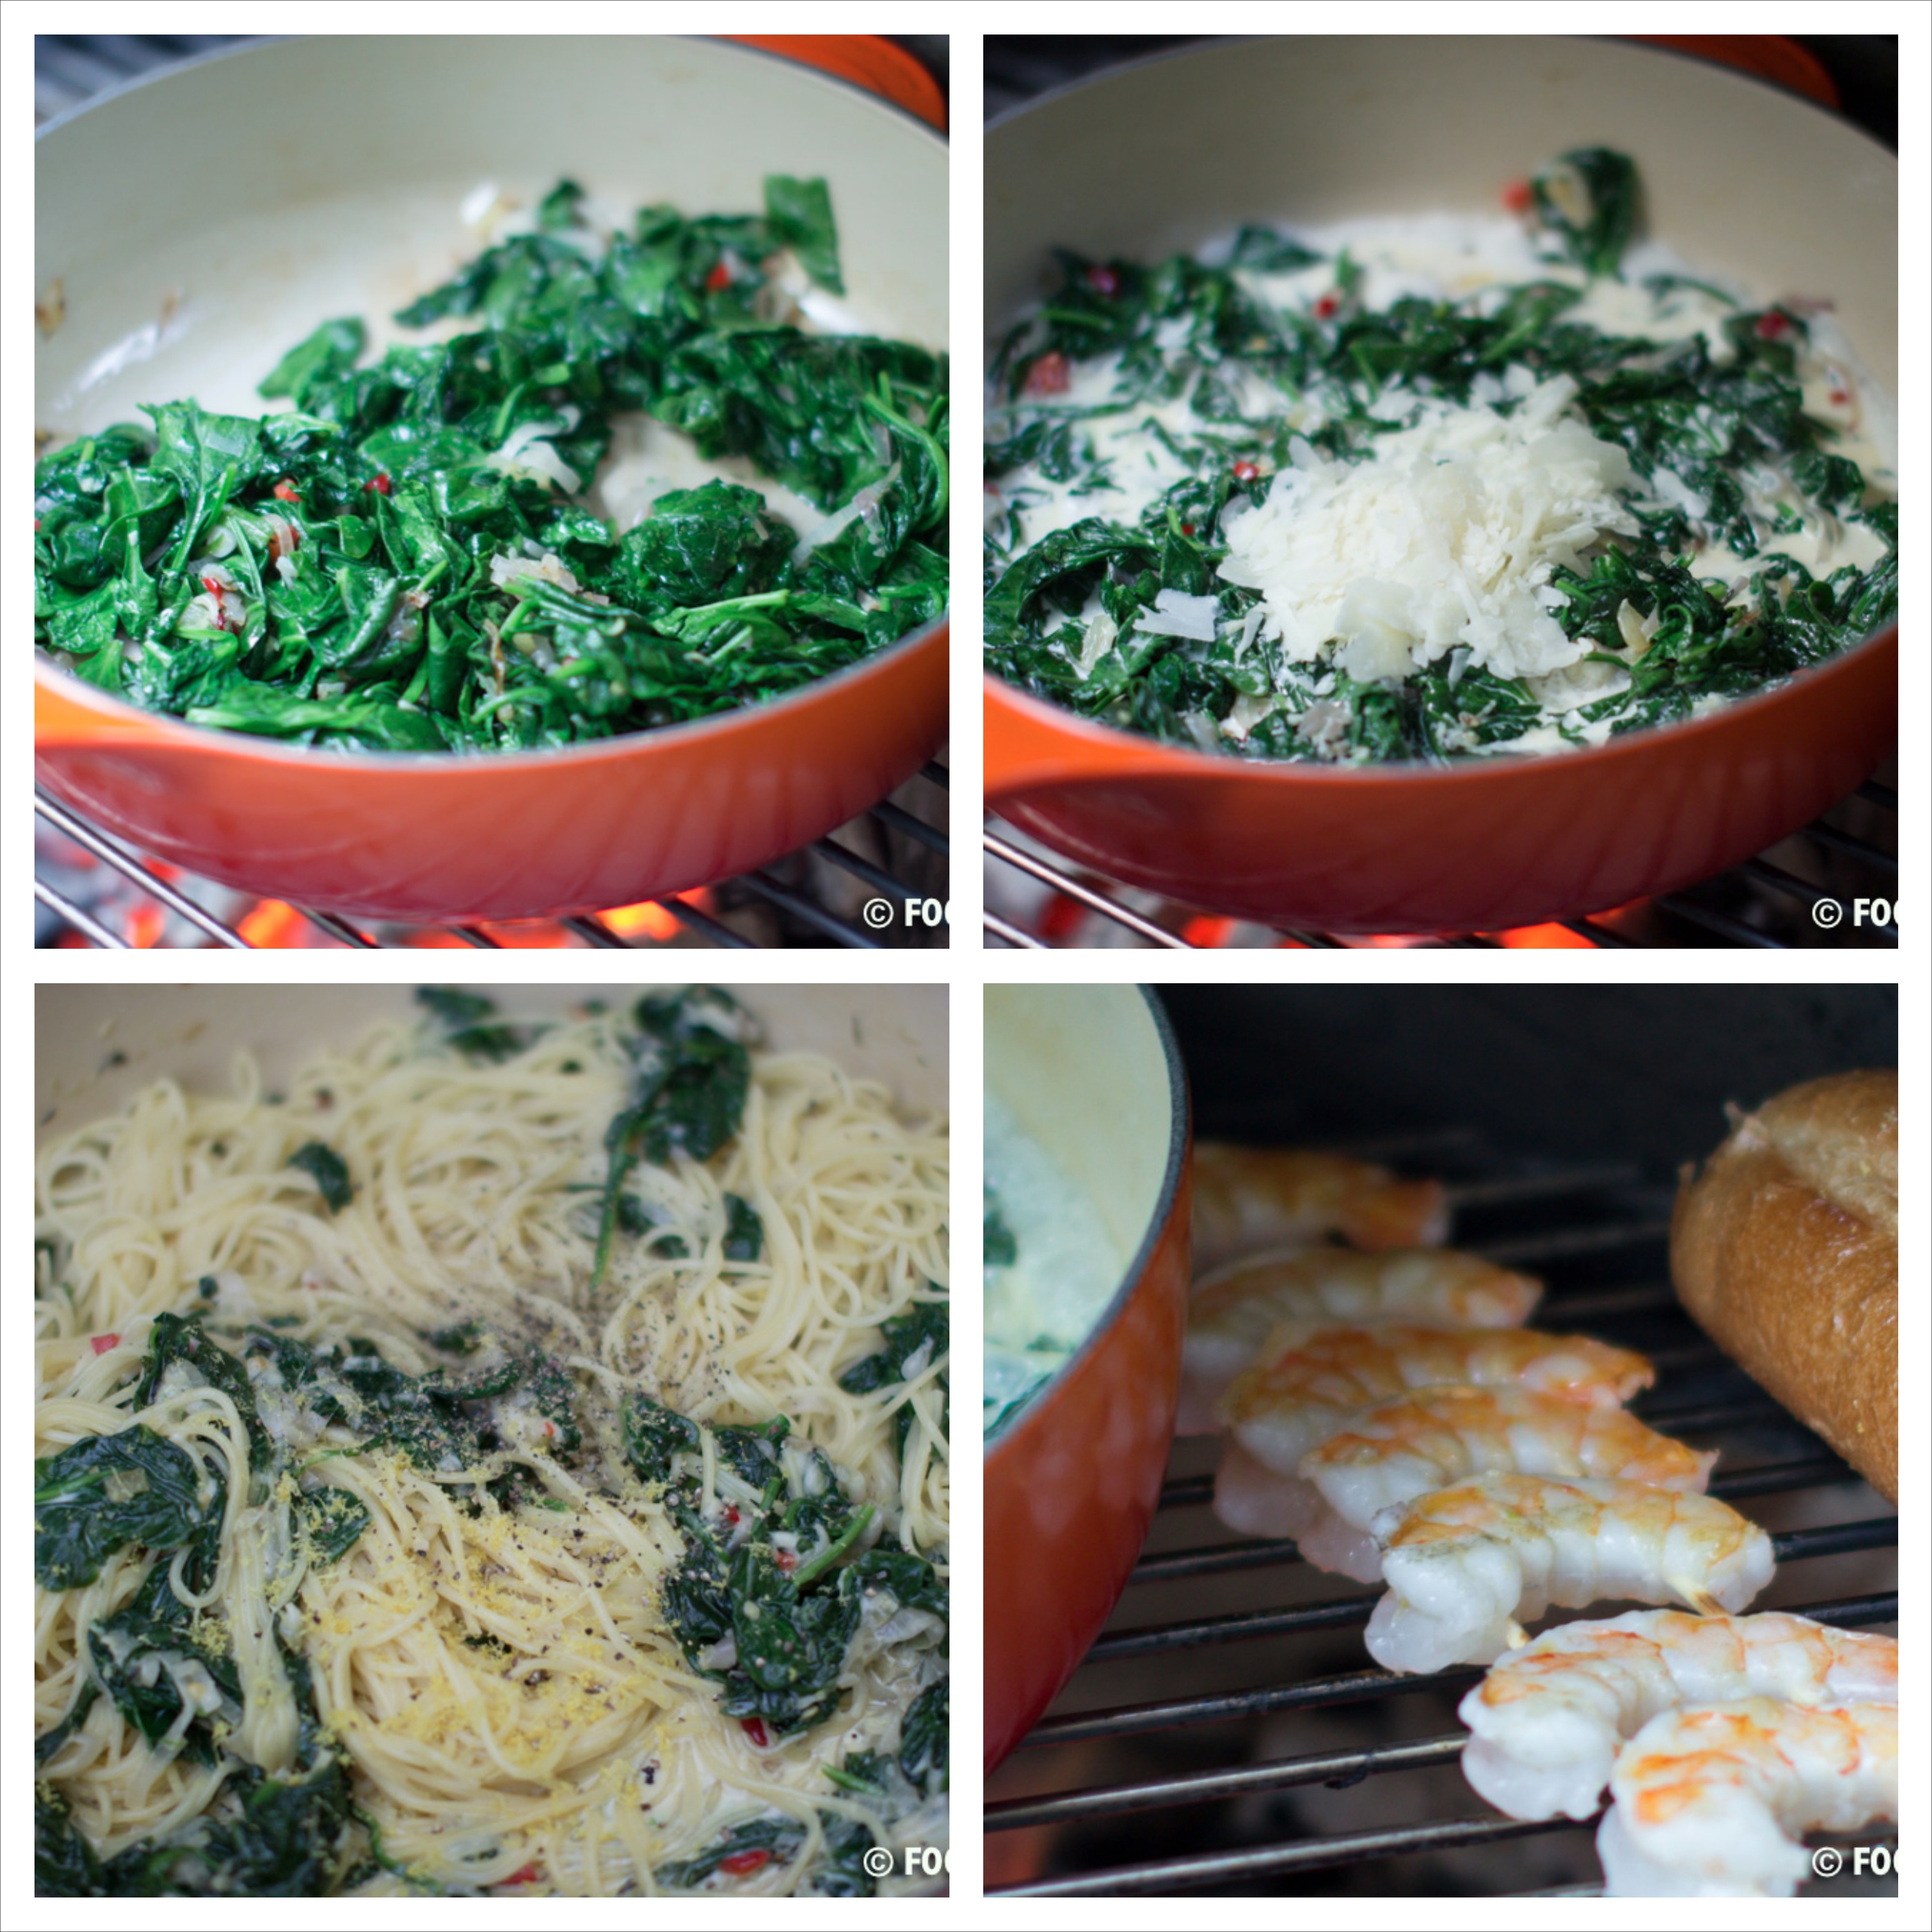
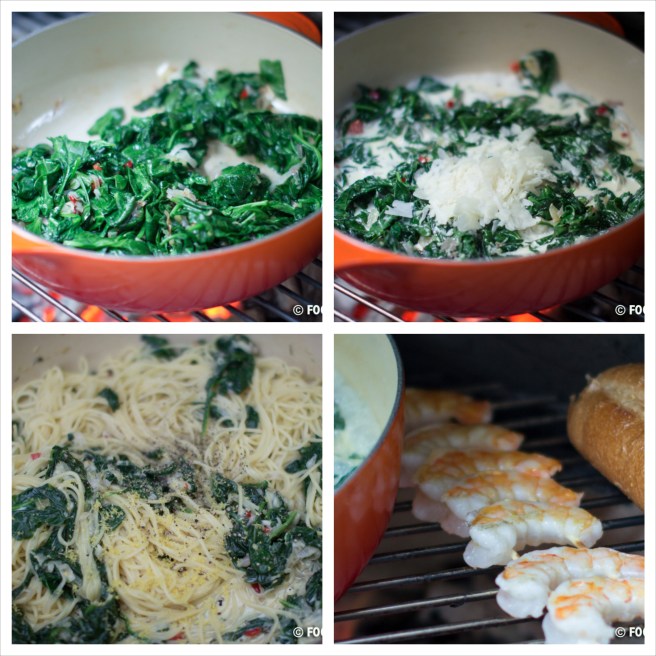
Next step is to melt the butter a medium-high heat (I made this portion on our Big Green Egg, but you can of cause make it on a regular stove as well) in a relatively large sauté pan – remember that all your ingredients including the cooked spaghetti will go in to the pan. Add shallots, chili, garlic, lemon zest and thyme to the melted butter and stir once in a while during the sauté process. Turn down the heat to medium and add the spinach when all the butter has been absorbed into the onions and stir to combine. Place a lid on the pan and leave it like that for 3-4 minutes – this gives the spinach time to release all the water without you interrupting it by stirring all the time (this was a mistake I made for many years cooking spinach – the more you stir, the more you ruin the texture of the spinach).

Shrimp and Spinach Pasta collage 1

Take the lid of the pan and let some of all the spinach water evaporate for a minutes or two before adding cream, parmesan and fresh black pepper. Stir carefully to combine and then leave it for a few minutes while you make the shrimps.
Fry the shrimps in a little bit of vegetable oil or butter or place them on the grill like I have done here. They only need a few minutes on each side, so make sure that you don’t forget while preparing the rest of the dish.

Shrimp and Spinach Pasta collage 2

Add the cooked and spaghetti to the spinach mixture when almost all the cream has evaporated. Stir carefully and season with salt and even more fresh black pepper.

Divide the spaghetti and spinach dish on four plates and place 4 shrimps on top of each. Then garnish with a little bit of grated parmesan cheese and serve with a warm French baguette and a cold glass of Chardonnay 🙂Shrimp and Spinach Pasta 11

Bon Appétit Friends!

Ingredients (4 servings)

1 tbsp. butter

3 large banana shallots

1 red chili

2 garlic cloves

1 tbsp. fresh thyme

400 g spinach

1 lemon, zest

80 ml cream

0.6 dl parmesan cheese, shredded + more for serving

500 g spaghetti

20 wild caught tiger shrimps

Salt & Pepper

Cilantro Heaven and Pesto

Hey there followers,

just wanted to let you know that we are still here and we have not forgotten about you 🙂 On the contrary we have thought about the blog every day since leaving Denmark.

When first arriving to Atlanta on April 1. we had no place to stay and was so lucky that we could stay with some family friends for the first week. The following we stayed at a hotel on downtown and then left for Savannah and Charleston to celebrate my 30th birthday. Being back from our trip we moved in to a nice little town house in Roswell, 20 minutes north of Atlanta. When we moved in we had nothing, and mean nothing, except our two suitcases with cloth.

You might think that it is a womans biggest dream to go and shop for EVERYTHING, and so did I until it was my turn to do it… So instead of buying everything at once we ended up buying the most necessary things to begin with and then buy more as we need it. This has had a huge influence on our cooking and therefore also our blogging. However, we now seems to have enough kitchen stuff to make every day cooking easy and delicious and we will therefore strive to blog as much as possible again.

Cilantro Heaven

Cilantro has been one of our favorite herb for years, but in Denmark it can only be bought in small amounts at well-stocked super markets and then it was pretty expensive – at least compared to the amount needed. Over here, in the US, you can get huge bundles of cilantro on every street corner and I just love it – for me it is like cilantro heaven… And even though I can buy it every were I have sown some seeds and are now waiting impatiently for it begin to grow so that I can go out on out patio and pick it fresh and put in my chicken and cheese panini or as garnish on top of a delicious curry dish.
I buy cilantro every time I get to Farmer’s Market or the local super market and sometimes I get a little to excited and buy too much, which is what happened the other day when I bought 3 bundles when I only needed 1. When I opened the fridge this morning I realized that the last of the 3 bundles looked a little tired and needed to be used immediately or it would go to waste, and as a new thing in my new American life I have decided that nothing should go to waste unless it is dangerous to consume. So I thought “why not make a cilantro pesto?” and so I did…


Ingredients (1 cup)

1/2 cup roasted cashew nuts

2 cups cilantro

1/3 parmesan cheese, grated

2 garlic cloves

1/2 cup + 2 tbsp. extra verging olive oil

1 tbsp. lemon juice

1/2 tsp. salt

1/4 tsp. pepper

Cilantro Pesto 1

Put all the ingredients in a blender and mix at medium speed until smooth. Taste and add more lemon juice if necessary. The same goes for salt.
If you are the type that likes it a bit more chunky, you can stop the blender for every 5 seconds to take a look and stop when it has the wanted consistency.

Place the finished pesto in an air tight jar and store in a dark place. When you have opened the jar the first time, you can help preserve the remains by pouring some olive oil over the pesto, just so it is covered, before closing the jar.

Cilantro Pesto 2

Bon Appétit!

Ingredients (2.5 dl)

1.25 dl roasted cashew nuts

5 dl cilantro

0.8 dl parmesan cheese, grated

2 garlic cloves

1.5 dl extra verging olive oil

1 tbsp. lemon juice

0.5 tsp. salt

0.25 tsp. pepper

Chocolate Praline Berry Tart

Time is running and we are leaving Denmark in less than two weeks! It has been a huge decision to leave family and friends and travel to the land of opportunities. Chris and I are quite different when it comes to leaving loved once behind to fulfill our own dreams and hopes for the future, but not once have we disagreed on this decision!

With only 10 days left, we have sold almost all of our kitchen tools so cooking can be quite challenging (and some days quite boring)!! We are used to cooking whatever we want on that particular day, but with a freezer that needs to be emptied and only few tool it takes a lot more kitchen creativity to get interesting and delicious food (I’m not saying that few ingredients and no tools = bad food, I’m just saying that my imagination is somewhere else these weeks, trying to figure where to live, how to buy a car (+ insurance), buying a phone etc.)

Even though the freezer and pantry is almost empty, there is still one ingredient that I have dozens of: CHOCOLATE. I always have lots of chocolate in the house, so that I can create delicious chocolate dreams all day and night if desired 😀 And today has been one of those days where I just wanted to celebrate the existence of world class chocolate, and bake something delicious and pretty for tonights marriage date! Thankfully I haven’t sold my pie dish yet, and I therefore decided to make this fabulous (and pretty) chocolate praline tart with strawberries. If you have trouble finding good strawberries, you can use other berries like raspberries or blueberries. Tonight I’ll serve the tart with a scoop of creamy home made vanilla ice cream, but but you can also serve it with sour cream or just as it is 🙂


Ingredients (8 servings)

1 cup flour

2/5 cup icing sugar 1 tbsp. cocoa powder

1 stick butter, cold and cubed

1 large egg yolk

1 tsp. water

Pinch of salt


Praline Filling:

4/5 cup double cream

3 1/2 oz. dark chocolate chips (70%)

5 oz. hazelnuts, skinned and finely grounded


Topping:

10 oz. strawberries (or other berries)

10 scoops vanilla ice cream (optional)


Begin by making the pastry. Shift flour, icing sugar, cocoa powder and salt into a large mixing bowl and add the cold cubed butter. Use your fingers and rub all ingredients together until it looks like breadcrumbs. Then add egg yolk and water and mix well with your fingers until you can form a ball of dough. Cover the dough with plastic foil and refrigerate for at least 1 hour.

Preheat oven at 360F and lightly grease a 9-inch pie dish. Place the dough between two pieces of baking paper and roll it out until it can cover the pie dish. Remove the baking paper and place the dough in the dish and trim the edges. Place one of the used pieces of making paper on top of dough and fill it with baking beans (you can also use rice or some other heavy thing, that prevents the dough from raising). Bake for 20 minutes before removing baking beans and baking paper. Bake for 15 more minutes. Place the baked pastry on a wire rack to cool.

Bring cream to a boil and pour it over the chocolate chips. Let rest for 30 seconds before stirring. Add the hazelnut flour when all the chocolate is melted and stir to combine. Let thicken a bit before pouring it into the baked pastry and smooth with a spatula. Leave to cool completely.

Slice the berries (only you use strawberries – all other berries should be added whole, or at least I think so) and place them on top of the cooled chocolate tart.

image

Serve immediately as it is or with a scoop of good vanilla ice cream :-


Bon Appetit!


Ingredients (8 servings)

125 g flour

50 g icing sugar 1 tbsp. cocoa powder

110 g butter, cold and cubed

1 large egg yolk

1 tsp. water

Pinch of salt


Praline Filling:

200 ml double cream

100 g dark chocolate chips (70%)

150 g hazelnuts, skinned and finely grounded


Topping:

300 g strawberries (or other berries)

10 scoops vanilla ice cream (optional)

Two Hour Cardamom Buns

I woke up at 6 am this morning feeling fresh and ready to bake all sorts of cakes and other delicious treats for my lovely husband. Entering the kitchen I realized that almost none of my baking plans could be realized, as I have sold almost all my kitchen- and baking tools as we are about to move from one continent to another.

I knew that Chris and one of his good colleagues was going to work on one of Chris’ many furniture projects today, so instead of baking small and petit cakes, i decided to bake some quick and easy cardamom buns that I could deliver at the workshop if they got hungry during the day (it didn’t take them long to eat half of the portion, before getting back to work) 🙂 nice to know when your food is appreciated :-).

Picture: Chris’ working hard on a bedside table and two dining chairs.

1959378_10151951504886444_1183193224_n

The recipe for these buns is originally without cardamom, but I love to add different spices to this simple recipe to give a little twist once in a while. If you like your buns more buttery and plain, you can just leave out the cardamom and brush the buns with melted butter instead of milk.


Ingredients (12 buns)

2 tbsp. active yeast

1 stick butter

1 cup whole milk

1 tsp. sugar

1 tsp. salt

2/3 tsp. ground cardamom

1 small egg

3 cups + 3 tbsp. flour

2 tbsp. milk for brushing


Melt butter at medium heat in a sauce pan. Remove the sauce pan from the heat when the butter is melted and add the milk. Let cool for a few minutes.

Add yeast and cooled butter/milk mixture to a mixing bowl and stir to dissolve the yeast. Then add sugar, salt, cardamom, egg and 1/2 of the flour. Stir until combined and add the remaining flour and stir again. When the dough is just about to be combines, you can pour it onto a slightly floured surface and knead using your hands. This way you will get a better feeling with the dough. Knead until the dough is smooth and doesn’t stick to your hands.

Place the dough in greased bowl and cover it with plastic foil. Leave in a warm place to raise for approximately 45 minutes (the dough should double).

Preheat the oven at 400F.

Pour the dough onto slightly floured surface and divide it into 12 equally sized pieces (2.86 oz./81g). Gently roll the 12 dough pieces into balls and place them on a baking plate covered with baking paper. Cover the buns with a tea towel and let raise while your oven gets warm.

Brush the raised buns with milk and bake for 20 minutes. Transfer the baked buns to a wire rack to cool before serving. Serve slightly warm for breakfast or afternoon tea with great friends and family.

Cardemom Buns 1_Fotor_Collage

Bon Appétit!

Ingredients (12 buns)

30 g active yeast

110 g butter

2.5 dl whole milk

1 tsp. sugar

1 tsp. salt

2/3 tsp. ground cardamom

1 small egg

7.5 dl + 3 tbsp. flour


Spring Breakfast Eggs and Good News

Followers, I apologize for the lack of blog post the past month – time is running and unfortunately someone decided only to give the day 24 hours. We are in the process of packing down our entire life to move, and not just a few miles but from one continent to another 😀

As I’ve probably mentioned in other posts, I fell in love with the States when Chris brought me to Atlanta back in 2009. We had only been outside the airport for a moment we I said: “this feels like home”, and now  4.5 year later it is going to be my home 😀
I am overwhelmed with happiness that a year long dream became a plan, and that plan finally seems to be reality within the next 5 weeks.

Relocating from one continent to another also means that we are trying to sell as many as our things as possible, so that only few things will have to be shipped. As we also sell our kitchen tools, we will run into some trouble when cooking, so for the next month or two (until we have found something to live in, and bought some kitchen tools) the blog post will be rather simple, contain restaurant review from Atlanta, New York and Austin (TX), and so on….

For those of our followers that live in the US, we would be happy to receive restaurant recommendations, good advice on where to go and where not go – actually we’ll take any good advice at the moment, and will probably also ask many many questions 🙂

And now to the actual content of this post – my favorite breakfast Spring Breakfast Eggs. I make these eggs quite often as they are quick and easy, contain few ingredients and tastes delicious – what more can one ask for?


Ingredients (4 servings)

8 large eggs

1/4 cup cream

1/4 cup aged cheddar cheese, shredded

Salt & pepper

1 tbsp. butter

Herbs for garnish (I’ve used chives, watercress, pee shoots, red window box wood sorrel and nasturtium but choose your favorites).


Whisk the eggs together in a mixing bowl. Melt the butter at medium heat in a frying pan. Add the eggs and stir once in a while to mix. Add cream and shredded cheddar just before you think that your eggs are done, mix to combine and season with salt and pepper.
Turn off the heat and stir until the cheese is melted and the cream is incorporated into the eggs.

Transfer the scrambled egg to a plate and garnish with lots of fresh herbs – I prefer to use seasonal herbs, but choose your favorite (my own favorites are chives, cilantro and pee shoots) 🙂

Serve for sunday brunch with your loved once or make it after a trip to the gym (if you’re like me – “I believe in Fitness” – you can bring the eggs to the gym, to eat within the first 30 minutes after finishing workout).

These eggs is perfect for brunch together with these orange pancakes  and a glass of sweet and colorful carrot and clementine juice.

Spring Eggs

Bon Appétit!

Ingredients (4 servings)

8 large eggs

0.6 dl cream

0.6 dl aged cheddar cheese, shredded

Salt & pepper

1 tbsp. butter

Herbs for garnish (I’ve used chives, watercress, pee shoots, red window box wood sorrel and nasturtium but choose your favorites).


Sweet and colorful Carrot and Clementine Juice

As you might have guest I have a juice period 😀 I make juice of whatever fruit or vegetable we have in the fridge and until now they have all turned out to be delicious!! One of the more untraditional juices I have made recently is my green vitamin bomb with kale, pineapple and ginger. It might sounds strange, but I promise that it tastes wonderful and has a pretty grass-green color.
Not all my juice recipes has been documented – yet – as I make it as often as possible and not always has the time to take pictures. Even though I make juice several times each week I still haven’t made no. 1 juice on my to-do juice-list: beet root juice! And the only reason for this is, that I don’t have any latex gloves at the moment and as I use my hands to squeeze the juice they will get all purple for several days to come…

Well, as with all our other recipes I hope that you will enjoy this one and feel free to leave an comment with your thoughts and/or suggestions 🙂


Ingredients (4 cups)

10 large clementines

4 large carrots

2 large apples


Peel the clementines and remove the core from the apple and cut it into smaller cubes. Wash the carrots and cut the top end off before slicing it into smaller pieces. I prefer to keep the skin on carrot as it contains a lot of vitamins, but make sure that you have washed all the dirt off – otherwise I’ll recommend that you peel it.

Carrot and Orange Juice 1_Fotor_Collage

Add all the fruit and carrot pieces in a blender and blend at medium speed for 4-5 minutes. Pour the mixture into a tea towel covered bowl and gather the corners of the tea towel. Use both hands to twist the tea towel around and squeeze all the juice out of the mixture. You will end up will approximately a little less than 1 cup of dry fruit/vegetable waste.Carrot and Orange Juice 2_Fotor_CollageServe immediately with a few ice cubes or fridge for while until cold. The freshly squeezed juice can stored in the fridge for up to 48 hours.

Carrot and Orange Juice 6Bon Appétit!


Clementine and Orange Juice – true sunshine

I don’t know about you, but I really need to experience some sunshine very soon! The Danish winter weather has been so wired this season – it has been like a yearlong autumn with rain, storms and grey skies and it is not until recently that we have gotten a bit of snow. Actually some one told me the other day that we have only had 10 hours of sunshine in January… WTF ….!!! No wonder that I miss the sun and all it brings (including the important D-vitamines).
Well, if the sunshine won’t come to me and I don’t have time to vacationing right now, I will have to ‘settle’ with this PERFECT clementine and orange juice. It has a strong and still mild taste of summer and sunshine.


Ingredients (4-5 cups)

8 small clementines

2 large oranges

2 large apples


Peel clementines and oranges. I use a knife, but if you want to get as much out of the fruits as possible you can peel it using you fingers instead. Then remove the core of the apple and chop it.

Orange and Clementine Juice 1_Fotor_Collage

Place all the fruit in a blend and blend until smooth – it takes approximately 3-4 minutes at medium speed. Cover a mixing bowl with a tea towel and pour the blended fruits in the bowl. Assemble the towel and squeeze with both hands until all the juice is in the bowl and all you have left is the dry fruit meat. Orange and Clementine Juice 2_Fotor_Collage

Serve the freshly squeezed juice immediately with a few ice cubes or place it in the fridge to cool down before you serve it. I make it just before serving and even though I always store my fruit in the fridge, the end product still needs cooled down so I use ice cubes. Orange and Clementine Juice 9

Bon Appétit!

Green Vitamin Bomb

It seems to be juice week in our household this week! The past weekend I made apple/carrot juice and ginger/kale juice and yesterday I made a ginger/cranberry juice. Today I have made vitamin bomb with pineapple and kale that taste so wonderful that I’m sorry that I only made one portion (4 glasses) 🙂

When I tell people that I add kale to my juice, they look at me like I’m crazy! But take a moment a think about it… Kale a one of the healthiest vegetables to can spoil you body with. It contains, both protein, fibers, vitamins and minerals and studies have shown that kale contains substances that can help smother cancer cells!

If you want the juice to more clear in color and thin in consistency, you can just pour the juice into the towel and let it drip off – it takes from 2-6 hour and you will only get half the amount of juice + you will leave many of the healthy ingredients in the waste product. I therefore recommend that squeeze it as much as possible so that almost nothing is left for the trash can!

Hope the you will try one of my own favorite juices and you are welcome to leave a commend with your thoughts and/or suggestions for other juices 🙂


Ingredients (4 cups)

3 large apples, chopped

2 cup pineapples, chopped

2 tbsp. ginger, chopped

2 lemons, juice

2 large handfuls kale, rinsed

1 cup water


Pineapple and Kale Juice 1_Fotor_Collage

Place chopped apples, pineapple and ginger in a blender with lemon juice and water.

Blend for 1 minute or until the ingredients begin to form a smooth consistency. Add 1/2 of the rinsed kale (remember to rinse the kale very carefully as it often contains a lot of dirt) and blend again. Add the remaining kale and blend for a few minutes until the juice has a beautiful green color.

Cover a mixing bowl with a tea towel and pour half of the juice into the towel. Twist the towel and squeeze all the juice into the bowl. Do the same with the other half of the juice. Squeeze as much as you can – the waste product should be dry.

Serve the juice immediately with a few ice cubes in each glass or fridge for up to 24 hour.

Pineapple and Kale Juice 2_Fotor_Collage Pineapple and Kale Juice 11Bon Appétit!

Ingredients (1 liter)

3 large apples, chopped

5 dl pineapples, chopped

2 tbsp. ginger, chopped

2 lemons, juice

2 large handfuls kale, rinsed

2.5 dl water


Demant’s Cranberry Energizer

Processed juice or fresh home made juice?? Well, I definitely know what I prefer but until a few weeks ago I had never made a single juice myself! I insisted on buying a juice maker before make my own juices, but then suddenly I realized that that I didn’t need a juicer – all I needed was my fantasy, some extra tea towels and a washing machine 🙂

During that that week I have made several different juices using all sorts of fruits and vegetables and they have all been a success when served for breakfast or as today, after 2 hours in the gym.

Try this recipe which is filled with vitamins, minerals and antioxidants or make your own version with whatever fruits and vegetables you have in the kitchen (I can reveal that kale gives a beautiful green color and is one of the best vegetables you can serve, if you want to spoil your body).

Ingredients (2 cups)

4 apples

2 carrots

2 inches ginger

1/2 cup cranberries, fresh

1 lemon, juice

1 cup water, cold


Cut the apple into quarters and remove the core. Cut off the top of the carrot and peel the ginger. Cut apples, carrots and ginger into smaller pieces and place it all in a blender together with lemon juice, cranberries and water.

Cranberry Energizer 1_Fotor_Collage

Blend until completely combined and you can begin to se all the juices from the fruits and vegetables being released.
Cover a mixing bowl with a clean tea towel (I a few that are only used for juices or other similar processes) and pour the blended mixture into the tea towel.
Assemble the tea towel so that you can twist it and squeeze all the juice into the bowl. Keep squeezing into to only have a handful of dry vegetable/fruit leftovers in the towel. Pour the juice into a decanter and serve immediately with a few ice cubes or fridge to cool. Fridge for up to two days and remember to stir a few times before serving.Cranberry Energizer 2_Fotor_Collage

Pour the juice into a decanter and serve immediately with a few ice cubes or fridge to cool. Fridge for up to two days and remember to stir a few times before serving.

Serve for breakfast with warm honey buns or together with a handful of almonds and raisins after a couple of high intensive training 🙂

FOOD ON DEMANT (35 of 35)Bon Appétit!

Ingredients (0.5 liter)

4 apples

2 carrots

2 inches ginger

1.25 dl cranberries, fresh

1 lemon, juice

2.5 dl water, cold