Cilantro Heaven and Pesto

Hey there followers,

just wanted to let you know that we are still here and we have not forgotten about you 🙂 On the contrary we have thought about the blog every day since leaving Denmark.

When first arriving to Atlanta on April 1. we had no place to stay and was so lucky that we could stay with some family friends for the first week. The following we stayed at a hotel on downtown and then left for Savannah and Charleston to celebrate my 30th birthday. Being back from our trip we moved in to a nice little town house in Roswell, 20 minutes north of Atlanta. When we moved in we had nothing, and mean nothing, except our two suitcases with cloth.

You might think that it is a womans biggest dream to go and shop for EVERYTHING, and so did I until it was my turn to do it… So instead of buying everything at once we ended up buying the most necessary things to begin with and then buy more as we need it. This has had a huge influence on our cooking and therefore also our blogging. However, we now seems to have enough kitchen stuff to make every day cooking easy and delicious and we will therefore strive to blog as much as possible again.

Cilantro Heaven

Cilantro has been one of our favorite herb for years, but in Denmark it can only be bought in small amounts at well-stocked super markets and then it was pretty expensive – at least compared to the amount needed. Over here, in the US, you can get huge bundles of cilantro on every street corner and I just love it – for me it is like cilantro heaven… And even though I can buy it every were I have sown some seeds and are now waiting impatiently for it begin to grow so that I can go out on out patio and pick it fresh and put in my chicken and cheese panini or as garnish on top of a delicious curry dish.
I buy cilantro every time I get to Farmer’s Market or the local super market and sometimes I get a little to excited and buy too much, which is what happened the other day when I bought 3 bundles when I only needed 1. When I opened the fridge this morning I realized that the last of the 3 bundles looked a little tired and needed to be used immediately or it would go to waste, and as a new thing in my new American life I have decided that nothing should go to waste unless it is dangerous to consume. So I thought “why not make a cilantro pesto?” and so I did…
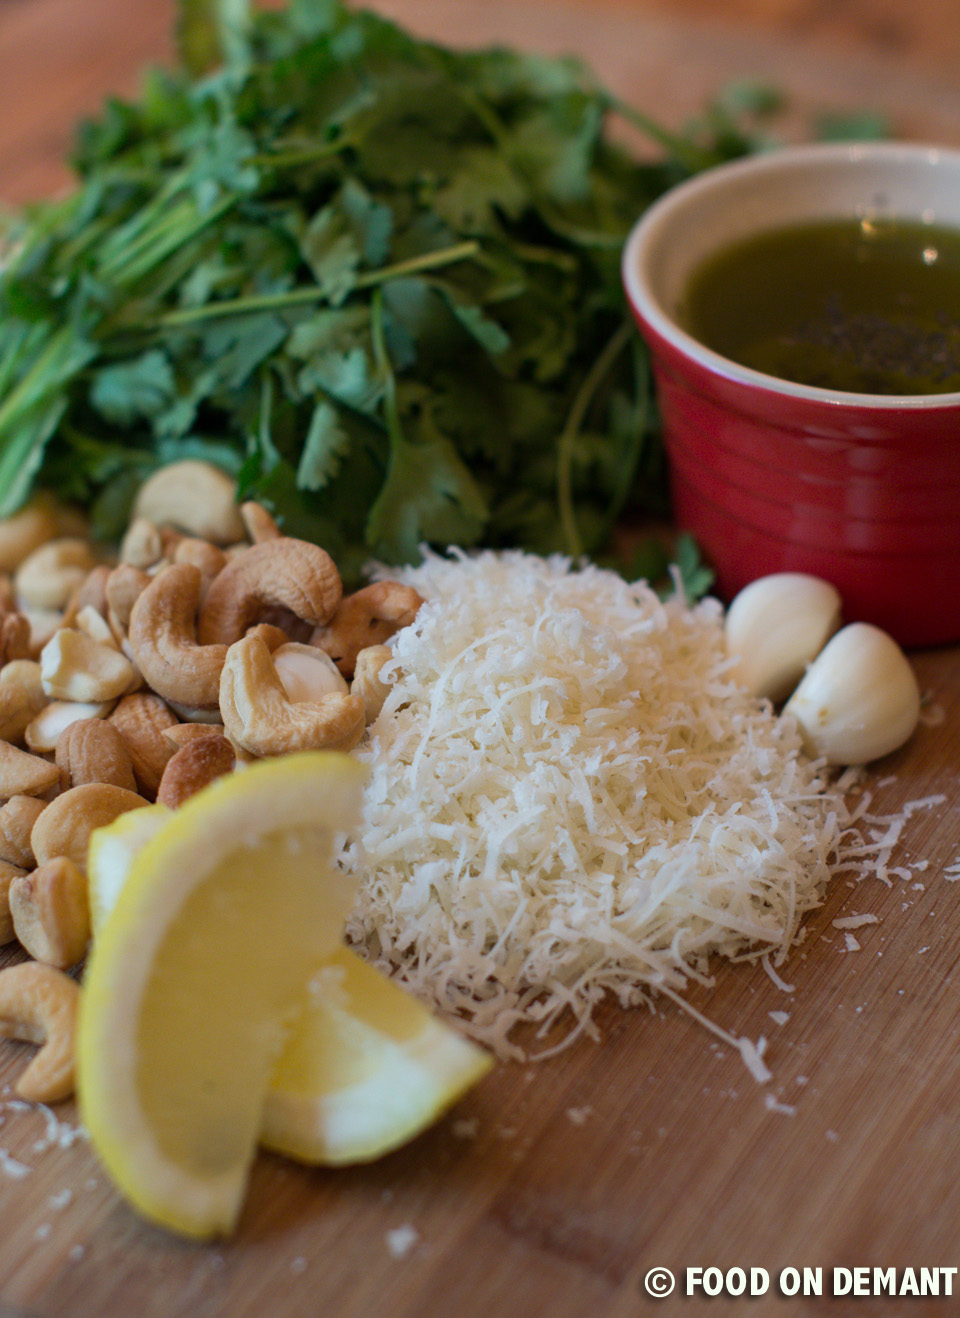
 

Ingredients (1 cup)

1/2 cup roasted cashew nuts

2 cups cilantro

1/3 parmesan cheese, grated

2 garlic cloves

1/2 cup + 2 tbsp. extra verging olive oil

1 tbsp. lemon juice

1/2 tsp. salt

1/4 tsp. pepper

Cilantro Pesto 1

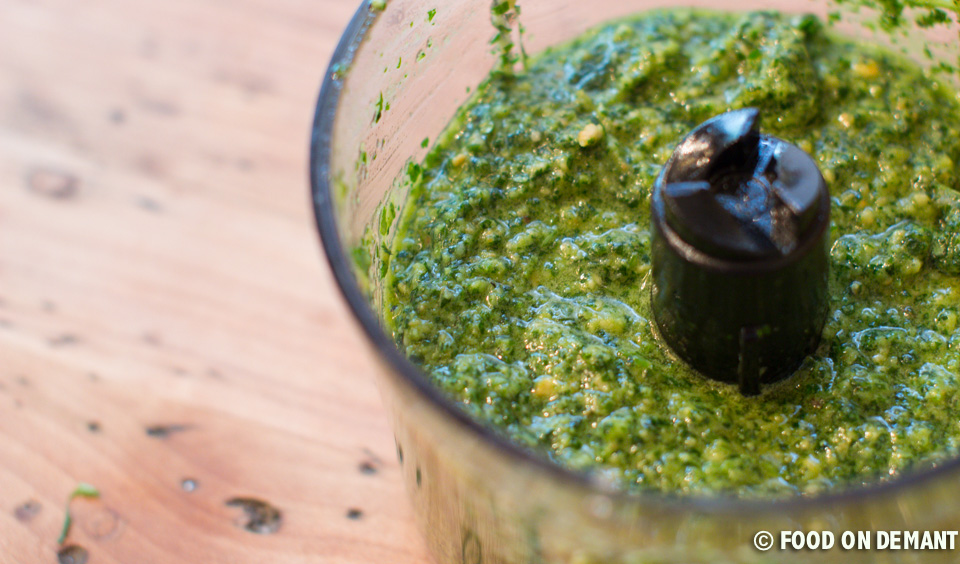
Put all the ingredients in a blender and mix at medium speed until smooth. Taste and add more lemon juice if necessary. The same goes for salt.
If you are the type that likes it a bit more chunky, you can stop the blender for every 5 seconds to take a look and stop when it has the wanted consistency.

Place the finished pesto in an air tight jar and store in a dark place. When you have opened the jar the first time, you can help preserve the remains by pouring some olive oil over the pesto, just so it is covered, before closing the jar.

Cilantro Pesto 2

Bon Appétit!

Ingredients (2.5 dl)

1.25 dl roasted cashew nuts

5 dl cilantro

0.8 dl parmesan cheese, grated

2 garlic cloves

1.5 dl extra verging olive oil

1 tbsp. lemon juice

0.5 tsp. salt

0.25 tsp. pepper

Advertisement

Happy New Year – passion and craftsmanship

HAPPY NEW YEAR followers 🙂 Hope that everyone came into the new year with smiles, happy thoughts and a lot of love!

We spent New Years Eve with some of our best friends (the picture below) at a nearby restaurant. Normally we spent New Years Eve at our apartment as we live in Midtown and have room for a great party 😀 But this New Years Eve was special as our beloved friend Ditte (on the picture) turned 25 at midnight…. Therefore we chose to let her decided what to do this year, and kind as alway she decided that Chris and I should have the day off to party instead of cooking and cleaning for 10-15 guests. Not that we don’t enjoy cooking for parties, but sometimes it is nice to be waited on instead of waiting on others.

After dinner we went back to our place to drink champagne and eat marzipan ring cake (a new years eve tradition in Denmark) and celebrate Ditte’s 25th birthday 🙂

New Years Eve 2013 (5 of 6)

A lot have happened the last year and one of my new year traditions is to look back at the previous year and list dos and don’ts for the upcoming year.

Looking back at 2013 there is especially one thing that comes to mind, which is why this post isn’t about food but about passion and good craftsmanship.
When we first meet back in 2009 I got very inspired by Chris’ creativity and passion for developing trash into gold. During the year his skills has developed enormously and today he makes most of our furnitures himself.  He was never good in school, he couldn’t (and can still not) sit still and listen for more than 5 minutes and so on…. But what he can do is use his imagination and hands to build whatever pops up in his head. The pictures below is a sample of the furnitures he build.


Dining Chairs
These dining chairs are handcrafted from 1 mm black iron. All the curves are made by hand and tools were handmade especially for this purpose.

chairs_1_Fotor_Collage chairs_2_Fotor_Collage


Dining Table
This beautiful dining table was a hand made wedding gift for me (what a lucky girl I am 🙂 ). The top is made of African Azobe wood (also called iron wood) that was used to build the old harbor here in town. When the harbor was updated and renovated the old wood was set to be discarded – luckily Chris found it and transformed it into the most perfect wedding gift anyone could ever give me 🙂

The bottom of the table is cast iron parts from an antique clothing roll. The table bolted together with handcrafted bolt in black iron. All iron has been browned (heated and dipped in oil) so that it gets a beautiful old finish.

Dining Table_Fotor_Collage


Coffee Table
The most recent project was this coffee table made from old timbered oak which we have been collecting from different parts of the country. Some of the iron part is cast iron from the clothing roll which was bought to make the bottom part of the dining table while some of the wooden parts (the handles) are from two old workbenches.

The top is assembled with old-fashioned handcraft methods, meaning that  it doesn’t contain any screws or nail. The wheels are iron cast wheels found at a local hoarders junkyard where we sometimes go to look for special items. As with all the other furniture bolts and everything else is handcrafted and browed to make it look a bit old.

The hight of the table can be adjusted using the two handles on top.

Table_1_Fotor_Collage Table_2_Fotor_Collage Table_3_Fotor_Collage


Creativity & Passion
I could keep on writing about all the fabulous furnitures and how proud I am of my husband, but I will spare you for that instead I will just say:


Be creative, be passionate and dreams might become reality!

Furnitures_Fotor_Collage(if you haven’t already guest it, we are big fans of cigars and whisky 🙂 )

All pictures of furnitures are taken by Martin from Applepark Photography.

Potted Pheasant Paté

It is the second time we make this delicious pheasant paté and it is just so damn good that we are going to make yet another portion tomorrow or the day after tomorrow, so that we can serve it for appetizers on New Years Eve before heading to the restaurant where we are going to eat this year.

We made it for the first time last winter and ate it in days, but never got time to make another portion as Christmas was coming. This year we have bought three pheasants and until now we have only used one, so there is plenty of pheasant meat to make another two portions so that we can spoil friend and family when they come over for a glass of red wine and a pheasant crostini 🙂


Ingredients (2 pots)

Pheasant Stock

1 pheasant, bones only

1 cup celeriac, diced

1/2 cup carrots, diced

1 cup onions, diced

10-15 peppercorns

Herbs (thyme, rosemary and bay leaves)

Water


Paté

1 pheasant, meat

1 large onion

3 cloves garlic

1 tbsp. duck fat

Salt and pepper

1 cup red wine

2 cups pheasant stock

2/3 cup bacon, diced

1/2 tsp. nutmeg, ground

1/2 tsp. black peppercorns

1/2 tsp. star anise

4 bay leaves


Stock

Skin and debone the pheasant – only the breast and leg meat is required for this recipe. Make sure that you have cleaned it thoroughly for feathers. Put away the pheasant meat while you make the stock.

Place the carcass and drumsticks in a sauce pan and cover it with water. Bring it to a boil while keeping an eye on it. Just before it begins to boil, all the impurities will come to surface – remove the impurities with a spoon so that your stock gets clear and pretty.

Pheasant Paté 1_Fotor_Collage

Add all the vegetables, peppercorns and herbs and let cook for one hour.
Strain the stock from the vegetables after an hour and continue to cook until the stock has reduced to the needed 2 cups (approximately 2 hours at medium-low heat).

Pheasant Paté 2_Fotor_Collage

Paté

Roughly chop onion and garlic cloves. Melt half of the duck fat and soften onion and garlic until the onions get a clear and shiny surface. Add the red wine and reduce until almost all the wine has evaporated. Add the stock and reduce again. You should end up with a approximately 1 cup of onion/stock.

Pheasant Paté 3_Fotor_Collage

While you reduce the stock you can prepare the meat. Mince the pheasant meat, diced bacon and the remaining duck fat on a coarse mince setting. Grind the peppercorns together with nutmeg and anise using a pestle and mortar. Add to the minced meat together with the stock reduction and pass it through the mincer again.
Season with salt and pepper and stir to combine all ingredients evenly.

Pheasant Paté 4_Fotor_Collage

Pheasant Paté 5_Fotor_Collage

Take a small amount of the mixture, fry if and taste. Season more if required.

Divide the mixture into two sterilized pots – be careful not to over fill the pots, otherwise the mixture will bubble over. Place two bay leaves in the top of each pot before putting the pots a bain-marie (water bath). Place the jar lids in a position where they can be closed quickly as soon as the come out of the oven.

Pheasant Paté 21
Cook in the oven at 320F for 60 minutes. Remove from the oven, seal the jar immediately and leave to cool. Unopened the paté can be stored at room temperature for up to 4 weeks – this, of cause. depends on weather you have used sterilized pots or not. Fridge when opened.

Pheasant Paté 23

Serve on a piece of toast as an appetizer for new years eve, birthday dinner or just for you and loved once on a cozy winter night with a glass of good red wine 🙂Pheasant Paté 24

Bon Appétit!


Ingredients (2 pots)

Pheasant Stock

1 pheasant, bones only

2.5 dl celeriac, diced

1.25 dl carrots, diced

2.5 dl onions, diced

10-15 peppercorns

Herbs (thyme, rosemary and bay leaves)

Water


Paté

1 pheasant, meat

1 large onion

3 cloves garlic

1 tbsp. duck fat

Salt and pepper

2.5 dl red wine

5 dl pheasant stock

1.6 dl cup bacon, diced

0.5 tsp. nutmeg, ground

0.5 tsp. black peppercorns

0.5 tsp. star anise

4 bay leaves

Home Made Favorite Lasagna

Almost every one knows how to make lasagna, but only few knows how to make a fabulous lasagna. And in the past we were no exception!! It has taken us several years to reach what we believe is the PERFECT result, but after using this recipe a few times we are certain that this is our favorite lasagna recipe – and the best is, that everything is home made 😀
Most people use béchamel sauce in their lasagna but you can use whatever sauce you like.

Do you have a favorite lasagna recipe??


Ingredients (4-6 servings)

Pasta

3 large eggs

1 tbsp. olive oil

2 1/3 cup Tipo 00 flour


Meat sauce

2 pounds beef, minced

2 large onions, chopped

3 garlic cloves, minced

3 large tomatoes, chopped

1 tbsp. dried thyme

1 tbsp. dried oregano

6 tbsp. tomato paste

1 cup red wine


Cheddar Sauce

2 cups whole milk

1 tbsp. butter

1 tbsp. flour

1 cup mild cheddar cheese

1 cup aged cheddar cheese

Salt

Pepper


Filling

1 pound fresh spinach

1 large onion

1 pound mushrooms, sliced


Directions

Pasta: Combine the three ingredients for the pasta and knead the dough until evenly combined and firm. Cover with plastic wrap and fridge for one hour.
While the pasta dough is resting in the fridge you can make the meat sauce and prepare the filling.
Roll the pasta dough on a pasta maker when you are ready to assemble the lasagna.


Meat Sauce: Melt the butter in a medium sauce pan and sauté the chopped onions and garlic together with dried thyme and oregano. Transfer to a plate when the onions has absorbed all the butter. Brown the minced meat in the same sauce. When browned, add the sautéed onions, tomato paste, chopped tomatoes and red wine and stir to combine. Turn down the heat and let cook until most of the liquids has evaporated – approximately one hour.


Cheddar Sauce: Melt the butter in a sauce pan, add the flour and whisk to form a roux. Slowly pour the milk into roux while whisking. Be careful not to add the milk to fast as it will ruin the roux. Turn down the heat and let cook for a few minutes while the whisking. Remove the roux from the heat, add the shredded cheese and stir until melted and combined. Season with salt and pepper.


Filling: Wash the spinach in cold water to remove any dirt. Sauté in a medium hot frying pan together with the chopped onion until all the spinach juice has evaporated. Transfer to paper towel to dry.
Clean the pan and to do the exact same thing with the mushrooms.

This lasagna has three layers of pasta in an 7 x 12 inch dish, so if your dish is smaller/larger you should ignore the measures used below.

Cover the bottom of the the dish 4/5 cup meat sauce. Pour 1/2 cup cheese sauce on top of the meat sauce and cover with pasta plates.

IMG_1627

Do the same with layer no. 2 but place the spinach between the meat- and cheese sauce. IMG_1628

In layer no. 3 is meat sauce, cheese sauce and mushrooms.IMG_1629

Now you should have used all your pasta plates (if your dish is 7 x 12 inches) and the final layer consists of the remaining meat- and cheese sauce. IMG_1630

Cover with aluminum foil and let rest in the kitchen table while your oven reaches 400F. Leave the foil on and bake in the middle of the oven for 30 minutes. Then remove the foil and bake for additional 15 minutes.
Let rest for 15-30 minutes before serving.

Serve with a an easy and fresh salad, for example romaine lettuce, sweet corn, tomatoes and cucumbers.IMG_1632

Bon Appétit!

Ingredients (4-6 servings)

Pasta

3 large eggs

1 tbsp. olive oil

300 g Tipo 00 flour


Meat sauce

900 g beef, minced

2 large onions, chopped

3 garlic cloves, minced

3 large tomatoes, chopped

1 tbsp. dried thyme

1 tbsp. dried oregano

6 tbsp. tomato paste

2.5 dl red wine

1 tbsp. butter


Cheddar Sauce

5 dl whole milk

1 tbsp. butter

1 tbsp. flour

2.5 dl mild cheddar cheese

2.5 dl aged cheddar cheese

Salt

Pepper


Filling

450 g fresh spinach

1 large onion

450 g mushrooms, sliced

Moist and Crispy Donuts with Sugar Coating

The Demant family is definitely a donut loving family, so it hurt our greasy hearts that we are not able to buy good, soft and greasy donuts in Denmark. Several places sell donuts but most often it is just a heavy and dry chocolate covered replica of a donut… One could wonder if the ‘creaters’ had ever tasted a real good donut – like those from Crispy Krem 😀

The recipe for these donuts is actually a CRONUT recipe (for those of you who do now what cronuts is, the easiest way to describe them is that it is a love child between a donut and a croissant). Actually we are not allowed to call it cronuts, as the ‘inventer’ has gotten copyright on the name – how wired is that??
Well, to get back to the recipe the butter was a little to soft and I blended it a few seconds to long so the flour mixture ended up being small crumbles instead of large one. Another thing which I did wrong (if the result were to be cronuts) was that I properly folded a rolled the dough to much without there being any flour between the layers, but as you can see on the pictures below it all ended happily with perfect moist, crispy donuts – actually my very first home made donuts 🙂

Donuts are actually easier to make than expected, but this recipe takes at least 12-15 hours including the resting time. I do not know if all donut recipes take that long, but I definitely believe that the long resting time has done something good for the end result – but try it yourself and leave a comment with your opinion 🙂


Ingredients (14 donuts)

1/4 cup water, room temperature

1/4 cup whole milk, room temperature

2/3 cup butter, cold

2 cups flour

2 tbsp. sugar

1 tbsp. dry active yeast

1/2 tsp. salt

1 cup canola oil for frying

2/3 cup sugar for coating


Combine water, milk and yeast in a mixing bowl and stir for a few seconds. Cut the cold butter into small cubes and place it in a blender together with flour, sugar and salt. Blend for a few seconds until butter and flour begins to crumble.IMG_1597

Add the crumbled flour mixture into the wet ingredients and use a plastics spatula to combine. IMG_1598

Pour the combined dough onto a floured surface and form a ball. Place in a bowl and cover with plastic wrap. Let rest in the fridge for 2 hours.IMG_1599

Place the rested dough on a lightly floured surface and roll it out until it is approximately 1/2-inch thick. Fold and repeat the process 4-5 times. Fold the last layer three times, wrap it in plastic foil and fridge over night.

Unwrap the rested dough and roll it out on a slightly floured surface. It should be approximately 2/3 inches thick. Use a 2 1/2 inch pastry cutter to cut out 14 donuts, and a 1 inch pastry cutter to cut the hole in the middle of the donuts. Place the donuts on a piece of baking paper, cover with a kitchen towel and let rest for an additional hour. IMG_1604

Place the canola oil in a frying pan and turn on the heat. The oil is perfect at 300F. Fry the donuts for 2-3 minutes on each side or until golden brown.IMG_1605 IMG_1606

Let the fried donuts rest on a piece of paper towel for a few minutes until dry, then turn them in the sugar 🙂

If you do not plan to eat them all at once, you can store them for 2-3 days in an airtight container at room temperature.IMG_1608 IMG_1609

Bon Appétit!


Ingredients (14 donuts)

0.6 dl water, room temperature

0.6 dl whole milk, room temperature

150 g butter, cold

250 g flour

2 tbsp. sugar

1 tbsp. dry active yeast

1/2 tsp. salt

2.5 dl canola oil for frying

1.6 dl sugar for coating

Creamy and Tasty Tomato Sauce

Most people buy a pre-fabricated tomato sauce in the super market, because it is easy, comfortable and cheap. But have any you considered how many additives it contains, as it can be stores at room temperature for several years?? It sounds a bit holy, but we are not – we often buy ingredients with 2-3 years expiration.

As we both love to cook and often but organic products, grow our own herbs and a small variation of vegetable (we live downtown and do not have the space to grow an awful lot, so we look forward to moving to place with a huge (vegetable)garden), we have decided to try and cook as much as possible ourselves and only buy things that we are too unexperienced to make ourselves or food from delicacy stores 🙂

The recipe for this tomato sauce is made with the ‘add-and-taste’ method, meaning that different ingredients were added until it reached the perfect taste and consistency. This also means, that we have made many different recipes before ending up with this one and we a portion of 5 cups only lasts for day or two in our household, as everyone loves it and it can be used for many different purposes 🙂


Hope that you will love it too!


Ingredients (5 cups)

2 large onions

4 garlic cloves

15 sun ripened tomatoes

1/2 cup red wine

1 handful fresh basil leaves

1 tsp. freshly grounded pepper

1 tsp. chili flakes

1 tbsp. butter

IMG_1048

Chop onions, garlic cloves and tomatoes. Melt butter in a medium sized saucepan and sauté the chopped onions and garlic cloves for a few minutes. Add the chopped tomatoes, stir and let cook at medium heat until the tomatoes has softened – it takes 5- 10 minutes. Stir occasionally.

Add the remaining ingredients and cook for 5-10 minutes or until the alcohol in the red wine has evaporated (when the smell of red wine has disappeared). Reduce heat and cook for an additional hour.

Remove the cooked sauce from the heat and let cool for 15-20 minutes. Transfer to blender and blend until completely smooth. Store in a sterilized jar in the fridge for up to 4 weeks.IMG_1049

Serve as a healthy tomato soup, as a regular tomato sauce for pasta, lasagna or as shown on the picture below with gnocchi and meat balls 🙂

IMG_1068

Bon Appétit!

Corn Tortillas

How often do you eat burritos/tortillas. Well, we eat them quite often as we find them perfect when ever we have leftovers. We have always just bought wheat tortillas from our local supermarket, but one day decided that we would try to make them ourselves.

To make original corn tortillas one need to get a flour type called masa harina (flour made from corn), which in Denmark, is easier said than done! It can only be bought in Chilihouse.dk, approximately 2 hours travel from where we live. Of cause we can buy it on their online shop, but postage costs more the the flour itself, so we decided to wait for a while. But to our luck a friend of ours visited the shop and bought a pound of flour, so that we could begin our tortilla experiment 🙂

As you can see in the recipe below, we chose to use chicken stock, but you can also just use hot water or if you want to spice it up a bit, you can use beer.

As with all other baking it takes time (approximately one hour), but we promise that it is all worth it 🙂


Ingredients (16 small tortillas)

2 cups masa harina (corn flour)

1 1/3 cup chicken stock, hot

IMG_0040

Combine flour with hot chicken stock to form a dough. Leave covered for 15 minutes. The texture should be soft clay but not sticky. Knead in more water if necessary.

Divide dough into 12 equally sized balls. Roll out dough balls between two sheets of baking paper until thin. If you would like your tortillas to be perfectly round, you can use a cake cutter (the one used here is 5.5 inches).

Heat a dry pan until hot. Place one tortilla in the pan and cook for 20-30 seconds on each side. Remove from the pan when the tortilla puffs up. Keep covered while baking the rest.

Fill with your favorite burrito stuffing and serve with a cold Mexican beer 😀

IMG_0044

Bon Appétit!

Ingredients (16 small tortillas)

500 g masa harina (corn flour)

3.5 dl chicken stock, hot


Home Smoked Bacon

How often do you use bacon when cooking? We use it several times at week for all sort of food and therefore decided to try and make it ourselves. We have tried several different methods before deciding to recommend this one.

It is quite time consuming, so be sure to make enough, so you don’t run out within the first few days.

Before beginning on your on bacon project, it is important to have a few key notes in mind. First of all, you need time and patience. It takes about 8-10 days from start to finish.

Second, don’t smoke it on a hot summer day, as the temperature needs to be below 81 degrees fahrenheit throughout the whole smoking process. If it gets to warm it can begin to deprave and the last weeks work will be lost.

Other than that, you should just give it a try – it is delicious, and you will find that the quality is much better, that what you can buy in the super market 🙂


Ingredients (2 pounds)

2 pounds pork belly

1 cup coarse salt

1 tbsp. black pepper

1 tbs. nut meg

10 juniper berries

1 tbs. thyme, dried


If you get the pork belly with bone in, remove the bones and use for stock or something else. Also remove the skin, but not the fat.

Mix together all the dry ingredients and rub firmly into the pork belly. Make sure that all sides of the meat has a good layer of rub on it. Wrap it closely in tin foil and put in an airtight bag. Remove all air and seal the bag. Refrigerate for at least 5 days (preferably 7 days) and rotate every day, to make sure that the meat juice don’t stay in the bottom.
IMG_5358

When refrigerated for 5-7 days the pork belly is almost ready to be smoked. Clean the meat for rub by rinsing it thoroughly in cold water for a few minutes. Make sure that all rub is removed and dab it dry with some paper towel and let rest on the kitchen table while preparing the smoker.

To smoke the bacon you will need a smoker or kettle grill, some tin foil and 1/2 a pound sawdust, a tbs. household alcohol, a small grid and a lighter. We own both a smoker and a kettle grill and this time we decided to use the kettle grill, but it makes no difference whether you use one or the other when smoking bacon.

Cover the bottom gridiron of the grill with tin foil. Place the saw dust in an unclosed circle around the edge of the grill. Make sure that the circle does not close, as this will shorten the the smoking time (in a closed circle the smouldering will burn both ways from the starting point, and thereby burn faster). Pour the household alcohol over one end of the sawdust and light it.  Wait till there is a good smould, and then blow out the fire – this takes approximately 5 minutes. Make sure that the glow continues before adding on the pork belly.

IMG_5408

When you are sure that there is a good glow in the sawdust, add the pork belly on a grid. If you use the grid from the grill, make sure that it is clean, as the temperature is low and therefor not able to kill any bacterias. For that particular reason we use a small grid which we can clean completely before and after using it. Place the meat in the middle of the kettle grill/smoker and put the lid on.

The bottom valve should be full open while the top valve should be a little below half. This bring oxygen to the smoking process, while keeping the smoke inside. This method keeps the sawdust smoldering for approximately 12-15 hours.

IMG_5411

After 12-15 hour the sawdust has burned out and you are ready to take the next step in the  ‘home-made bacon’ process. If you prefer the bacon taste more smoky you can double the smoking time.

IMG_5482

Remove the smoked pork belly from the smoker, and lay it uncovered on a plate in the fridge for approximately 24 hours.

IMG_5531

The pork belly has now transformed into a delicious piece of bacon 🙂

Cut it into cubes or thin slices and prepare it for your favorite bacon meal. We use it among other things in the morning, making eggs and bacon, for lunch making bacon sandwiches and for dinner making cheese burgers, broccoli salad or bacon explosion.

If you have never tasted home smoked bacon, you are missing something out of our life! It cannot be compared to super market bacon, which is less tasteful.

Hope that you will consider trying the recipe as we believe it bring the most exceptional and delicious result.

IMG_5493

Bon Appétit!

Ingredients (900 g)

900 g pork belly

2.5 dl coarse salt

1 tbsp. black pepper

1 tbs. nut meg

10 juniper berries

1 tbs. thyme, dried